How can I recover data from a corrupted (RAW) partition?
Given the tremendous progress in storage technologies over the past years, it is easy to fall under illusion that data saved on a computer's internal drive or another medium is something that can last indefinitely. Yet, the reality is that even the most modern and durable storage devices still have their vulnerabilities. For example, our mistakes and other unforeseen circumstances often lead to blocked storage access, and, as a result, the data on it can no longer be read or retrieved. One of the most typical scenarios is when a partition on an external drive or USB stick gets corrupted and turns into RAW, behaving as if it never stored any content. Fortunately, specialized data recovery software can come to help in such situations. Using proper tools and instructions described in this article, one can regain access to the faulty partition and bring those lost files back.
Hint: To learn more about all other types of RAW partition/drive issues and their causes, please, refer to the general article dedicated to this problem.
What is a RAW partition?
In fact, a RAW partition is one that was created but not yet formatted. It can be thought of as unprocessed storage space, incapable of storing data unless a valid file system structure is written to it. Different operating systems and devices may require different file systems, for example, NTFS is supported by Windows, while ext4 and APFS are common in the Linux and macOS environments respectively. There are also file systems that are meant for cross-platform use, like FAT32 and exFAT. Until the necessary file system is applied through formatting, the partition remains RAW, so the presence of RAW partitions is perfectly normal for an empty or completely wiped drive. However, this state becomes a problem when one of the available partitions suddenly shows up as RAW, and the user’s files become trapped inside of it.
In such an event, the file system field in Disk Management will display the "RAW" property instead of the usual file system type, such as NTFS, FAT32 or exFAT, or you can see an "Uninitialized" or "Unknown" partition in Disk Utility under macOS. In some cases, the file system type may be detected, but it is still impossible to mount the partition.
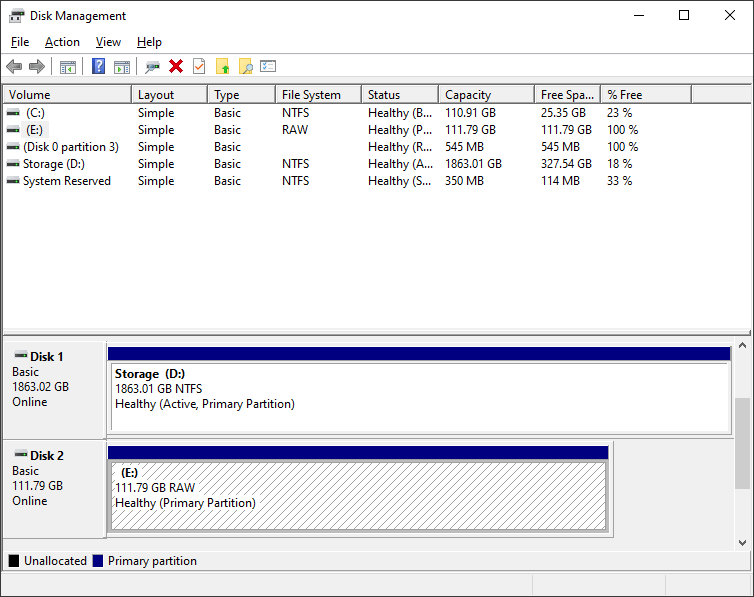
Pic. 1. RAW partition in Windows Disk Management.
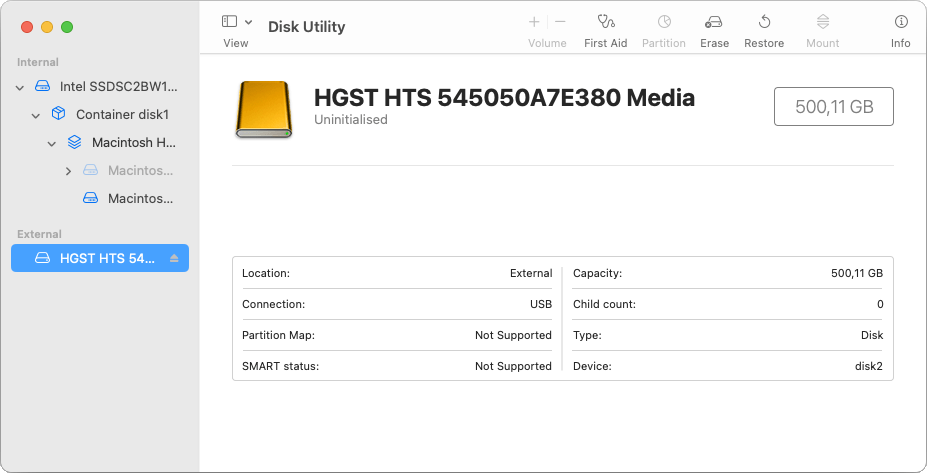
Pic. 2. Uninitialized partition in macOS Disk Utility.
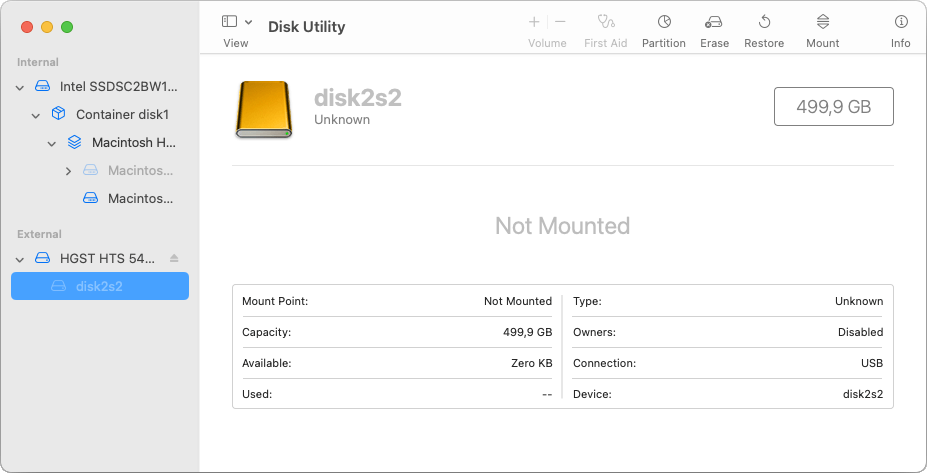
Pic. 3. Unknown partition in macOS Disk Utility.
When trying to open its content, you may also receive various error messages, for instance:
In Windows
- You need to format the disk in drive E: before you can use it. Do you want to format it?
- The disk in drive E: is not formatted. Do you want to format it now?
- E: is not accessible. The volume does not contain a recognized file system. Please make sure that all required file system drivers are loaded and that the volume is not corrupted.
- E: is not accessible. The file or directory is corrupted and unreadable.
- E: is not accessible. The parameter is incorrect.
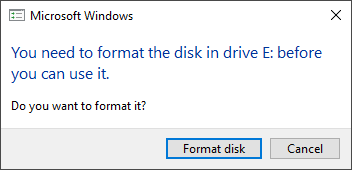
Pic. 4. RAW partition error message example under Windows.
In macOS
- The disk you attached was not readable by this computer.
- You must initialize the disk before using it.
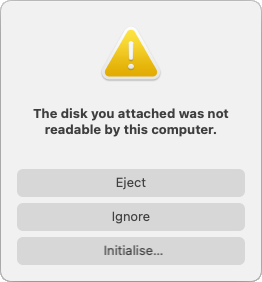
Pic. 5. RAW partition error message example under macOS.
In Linux
- Unable to mount <drive>: unknown filesystem type 'raw'.
- Disk is not a valid partition.
- Error mounting /dev/sdb1 at /media/user/drive: wrong fs type, bad option, bad superblock on /dev/sdb1, missing codepage or helper program, or other error.

Pic. 6. RAW partition error message example under Linux.
The reason for the mishap is that the operating system cannot recognize the file system on it anymore, perceiving it as blank or unreadable. This usually happens when the OS doesn’t find the expected file system metadata on the disk, either because it's missing from the typical areas or it's too corrupted for the driver to identify it. The most common cause is serious damage to vital records defining the file system type, like the partition table or boot sector.
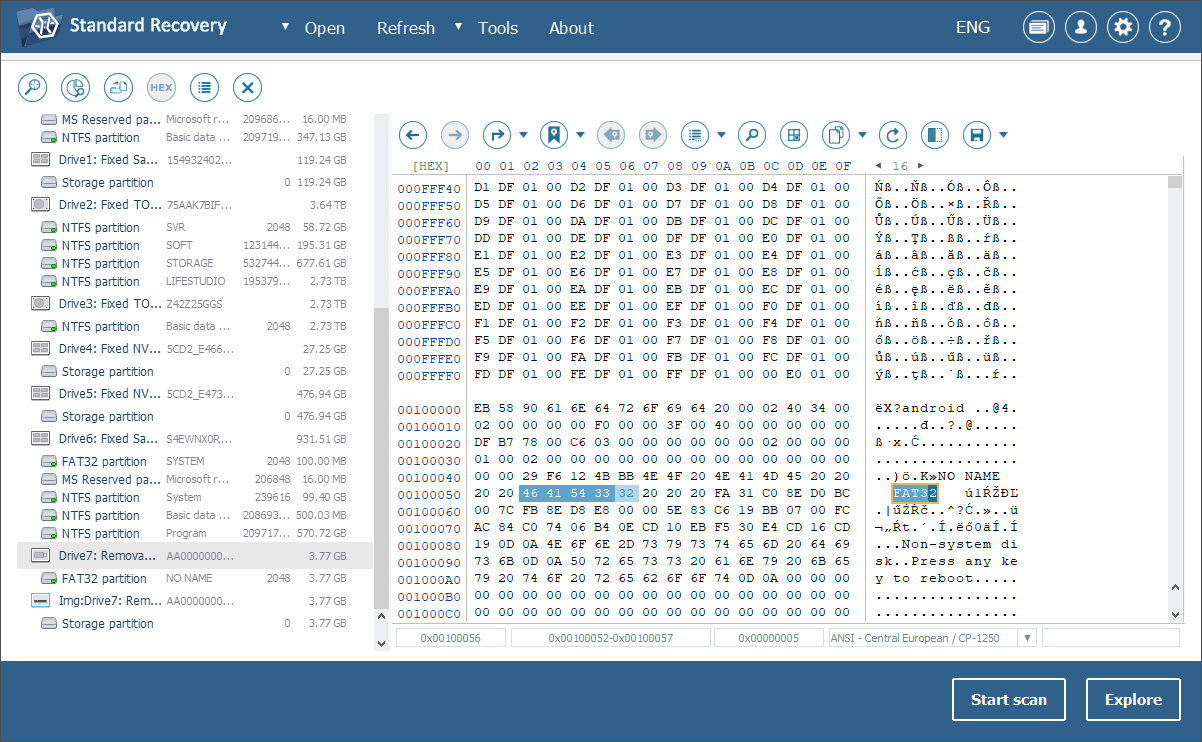
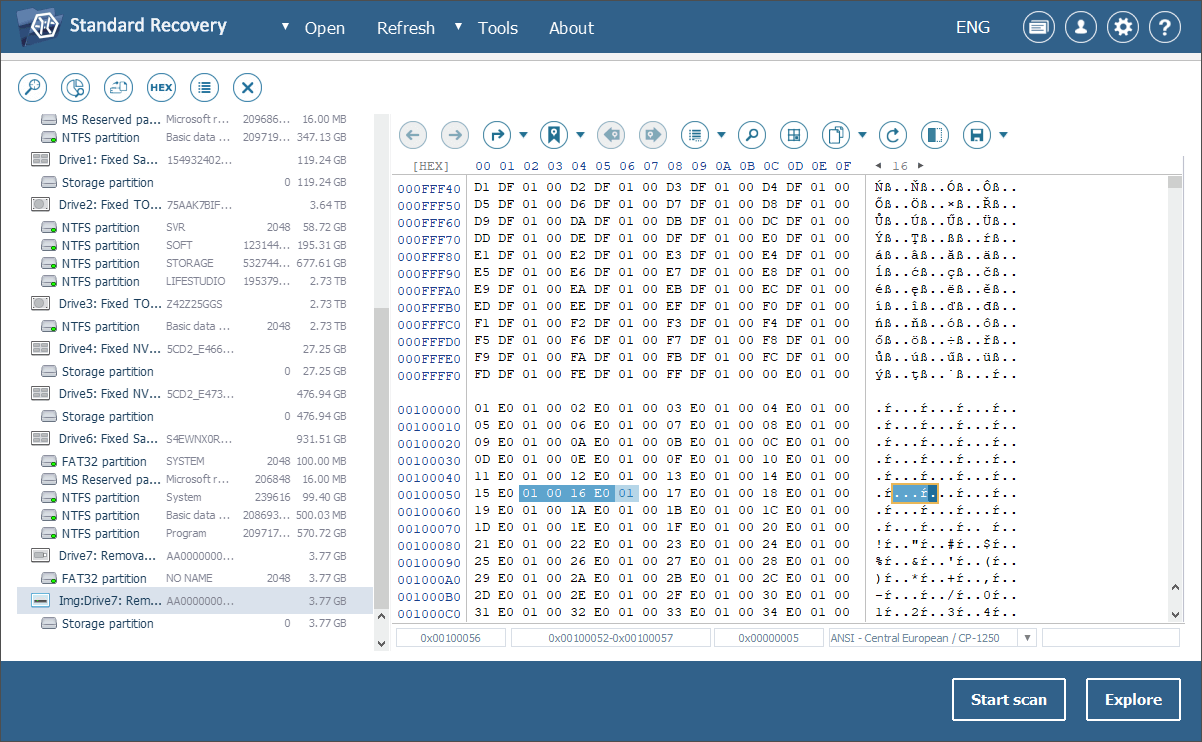
Pic. 7. File system damage example opened in Hexadecimal Viewer.
As a result, none of the available drivers can mount the compromised file system, but the data within it may still be intact.
What causes a partition to be recognized as RAW?
The issue can occur under any operating system and across various devices, including USB flash drives, SD cards, external drives and even internal drives, though it's significantly less frequent with fixed media, as they are less exposed to negative factors affecting removable drives. It also tends to be more prevalent on Windows, especially with FAT32 and exFAT file systems that have relatively simple metadata structures and lack modern protection features. Yet, in general, any device of any format may end up in such a situation, caused mainly by one of the following reasons:
- File system corruption or other types of logical damage
This is one of the most common incidents making a partition turn RAW. It involves damage to the file system on it or the metadata that results in the operating system being unable to recognize this file system. The damage may arise from:
- improper disconnection of the drive (without safe ejection);
- malware activities;
- sudden power outages or system shutdowns;
- incorrect formatting of the medium;
- errors during data processing or disk management.
- File system incompatibility
This occurs when a storage device is connected to a system that does not support the file system type applied on a partition. For example, Windows cannot interpret the file systems of Linux, so connecting an ext4-formatted drive to a Windows machine can result in the drive being displayed as RAW. And, generally, using a drive formatted with any proprietary file system on a non-native OS and without appropriate software will lead to recognition issues. They typically don’t require data recovery and can be solved using a simple guide to regaining lost access to files.
- Physical damage to the storage
Hardware problems may likewise lead to issues with reading crucial file system structures. So, in case the drive on which the RAW partition is located has undergone damage to its physical components, such as controller, platters, flash memory cells, connectors, etc., attempting inexpert data recovery can further compromise the device and make the task even more challenging. Only professional data recovery specialists can perform it successfully, since they have the expertise and tools essential to handle physically damaged storage devices.
Steps to restore a RAW partition without losing data
When the data previously stored in the RAW partition is no longer needed, solving the issue is very simple: you can format the partition with an appropriate file system, and it will become ready for data storage. However, if it still contains important data, formatting the partition is not an option, since this will erase the existing information. In such cases, specialized data recovery software should be used to retrieve the necessary files before attempting any fixes, ensuring they are preserved and copied to a safe location. It is also important to avoid any other operations that could potentially write anything to the partition, as this will also lead to the loss of recoverable data.
So, as long as there are no hardware problems, the proper algorithm for handling a RAW partition should include the following three steps:
- Running specialized data recovery software that can scan this RAW partition, read and analyze the remaining file system metadata and, on the basis of this, restore its structure and recover the files. After that, the content can be saved to another secure storage.
- Formatting this partition with the correct file system using the native disk management tool of your operating system.
- Copying the recovered data back to the formatted partition (if necessary).
Step 1. Data recovery
To restore files from a RAW partition, you can rely on UFS Explorer or Recovery Explorer, both of which are reliable and effective software solutions well-suited for data recovery from a variety of storage media having RAW partition issues. The programs support partitions that have been previously formatted with NTFS, FAT32, exFAT, APFS, HFS+, Ext4, XFS and many other common file systems used by Windows, macOS, Linux, and Unix/BSD. The software works by reconstructing essential file system metadata structures and locating the folders and files trapped inside the RAW partition. The recoverable items can then be saved to another secure storage, without risking further damage to the original data.
Provided there is no physical damage to the device, you can proceed with the steps outlined below to extract the data lost from the RAW partition. The procedure will be demonstrated here using UFS Explorer Standard Recovery as an example:
-
Download the software and install it onto the computer. Make certain that the downloaded version of the program matches the employed operating system platform.
Hint: If you have any difficulties with the installation of the utility, please refer to the installation manual for UFS Explorer Standard Recovery.
-
Ensure that the device holding the RAW partition you need to restore is attached directly to the host computer:
- in case of a non-system partition situated on an internal drive, the procedure can be performed on the same PC. However, if you are dealing with the system partition, you need to take the drive out of the computer’s tower (casing) and connect it to another PC as a secondary storage device or run this PC from a bootable (live) USB drive, as described in the provided instruction;
- a USB flash drive can be inserted into the computer’s USB port;
- an SD card or any other memory card can be placed into the computer’s embedded card reader or connected with the help of an external USB adapter/card reader;
- a microSD card can be attached via a suitable card adapter;
- a portable hard drive can be connected using any valid cable type (USB, Thunderbolt, FireWire, eSATA). If there is a power switch on your drive, remember to turn it on;
Hint: Please rely on the instructions if you need to attach your hard disk drive to the motherboard or connect the HDD externally using a USB to SATA adapter.
-
Run the program and, if needed, go to the settings tab where you can change its parameters.
-
Find your drive in the list of connected storages in the left pane and select the necessary partition from the list below. Such a partition may either have a detected file system type (with the status of damaged or restored from metadata) or an "Unknown" label. After that, hit the "Start scan" button at the bottom of the window or use the same option in its context menu or the tool from the toolbar at the top of list of storages to move on to scanning procedure configuration.
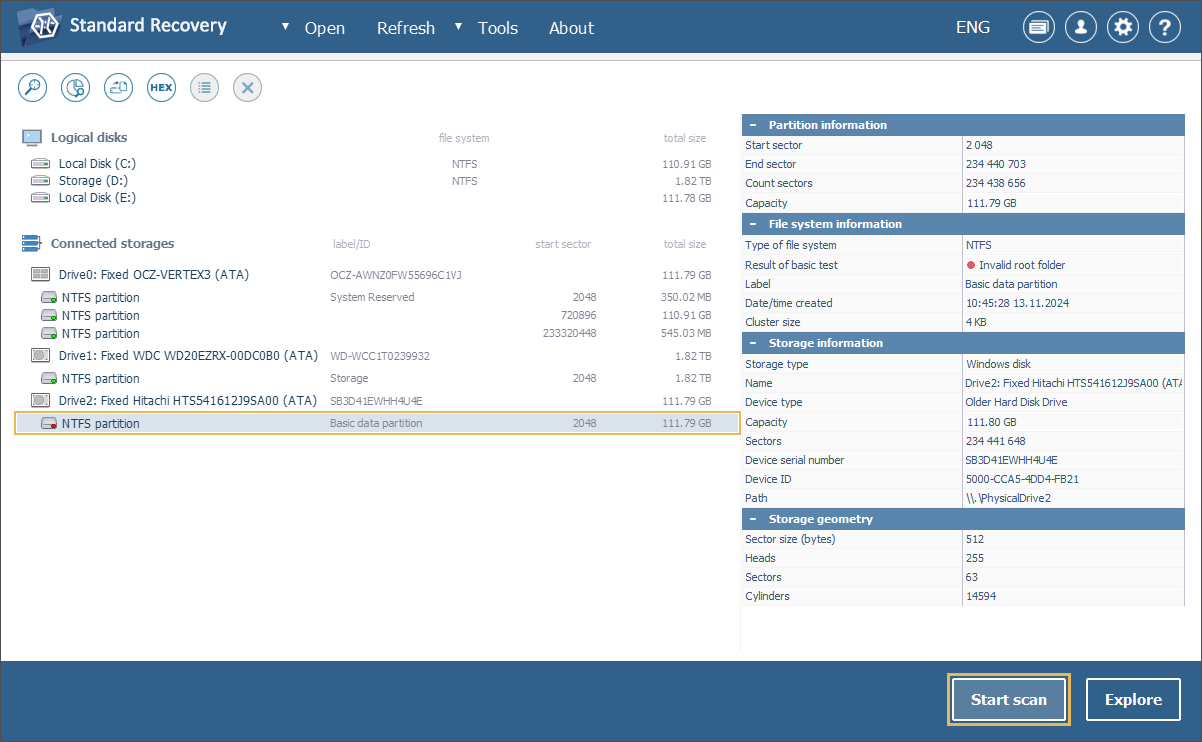
In case your storage device does not appear among the connected storages, you can press the "Refresh" button from the main menu at the top bar in order to update the list. Then try reattaching it and connecting it to another PC. If nothing helps, it is very likely that your storage medium has hardware defects, and you need to seek help of data recovery professionals.
-
Specify the desired scan parameters. You may deselect all file systems except the one applied on your storage. Yet, if you’re not totally sure concerning its type, you may leave them all selected. After that, press "Start scan" and wait for the operation to complete.
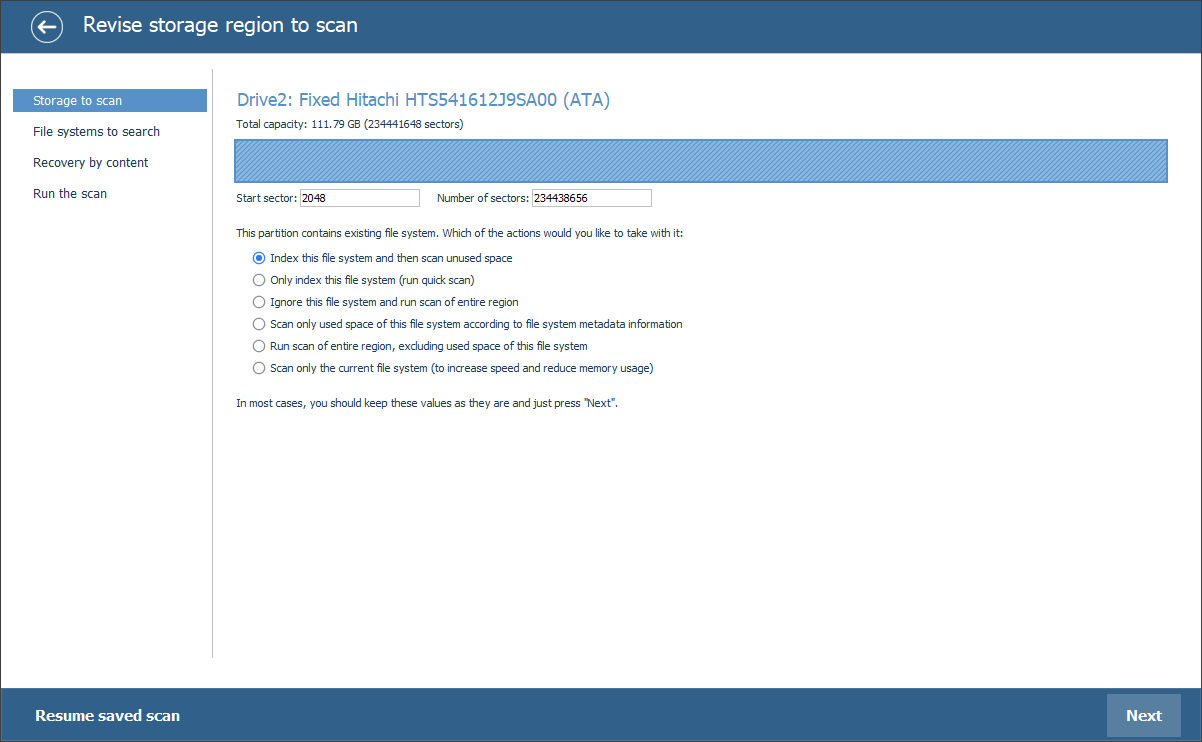
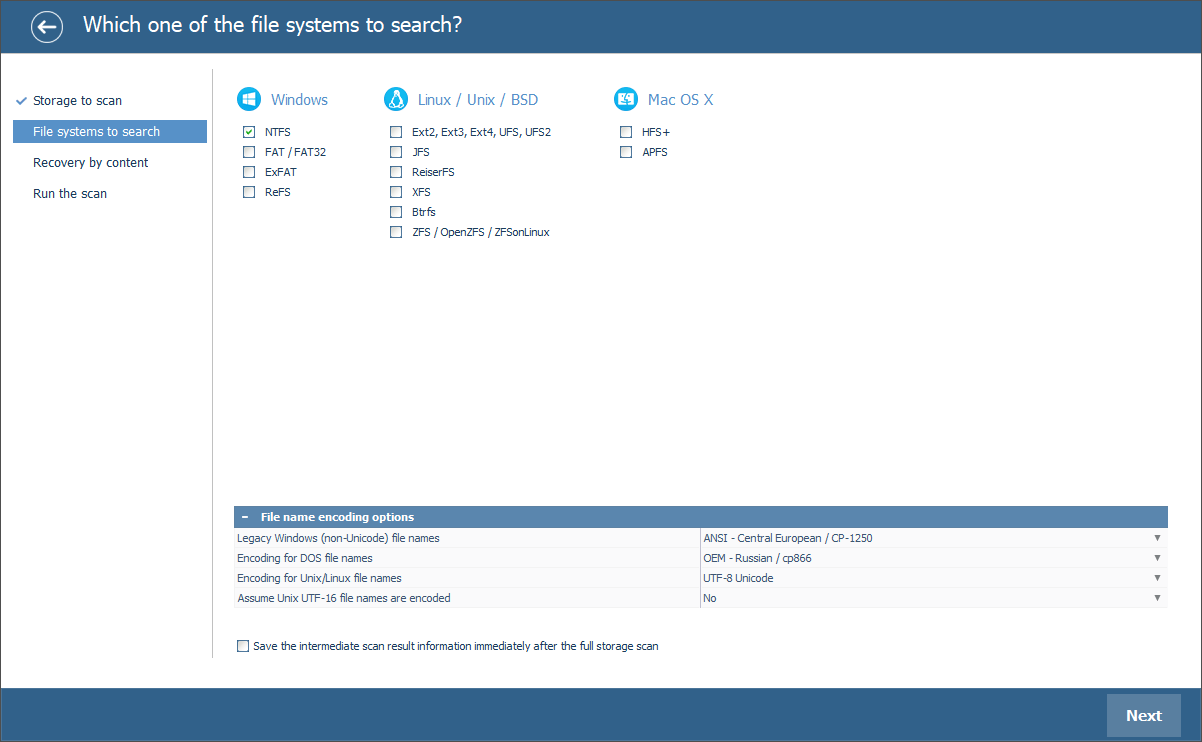
Hint: More information about configuring the scan can be found in the instruction on scanning a drive with UFS Explorer.
-
Check out the files and folders retrieved by the program. If the "Set up displaying of file status" tool is enabled, all files will show up with circular icons denoting their state: the green color suggests a "good" state of a file with a valid header; the red color indicates a "bad" (zeroed) file; a gray icon may appear when a file has been partially corrupted or its integrity test is impossible due to the format’s specifics. You may also sort the items by name, date, size, utilize quick or advanced search tools and preview the content of files in the internal viewer. Once ready, click "Define selection" and select the ones you are going to copy.
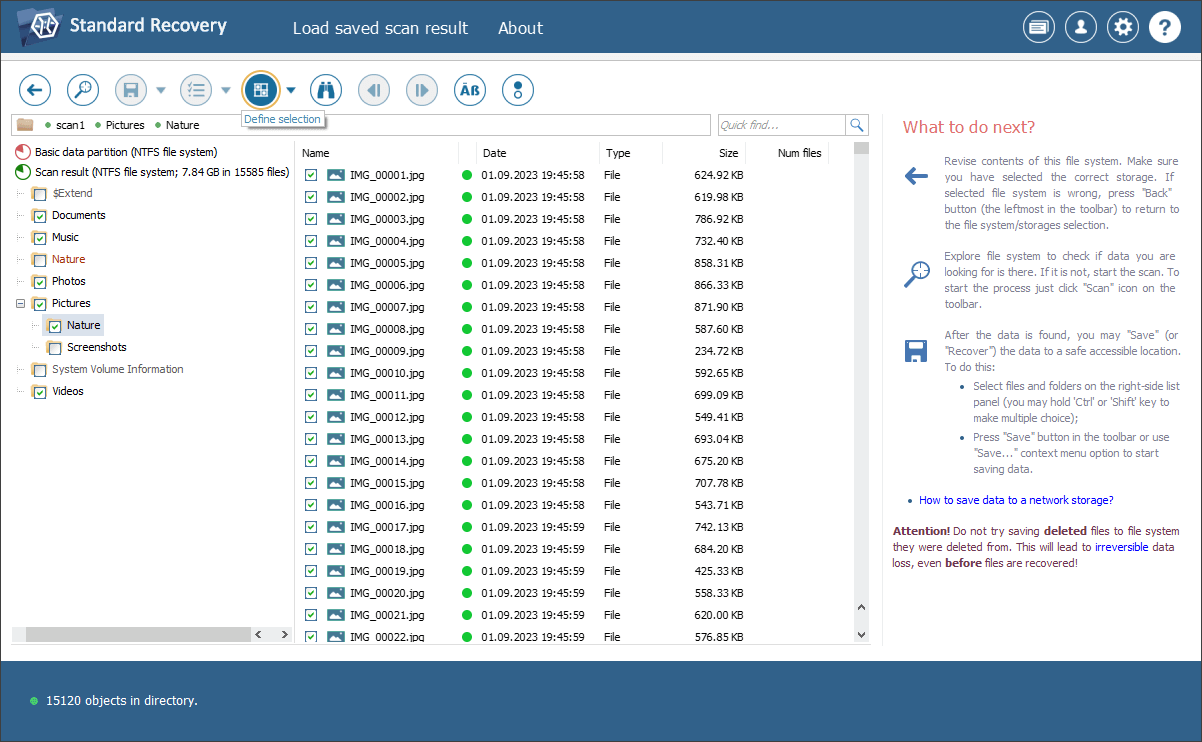
Hint: The information provided in Evaluation and saving the results of data recovery may facilitate your work with the obtained folders and files.
-
Save these files to any data storage device other than the storage from which they are being recovered.
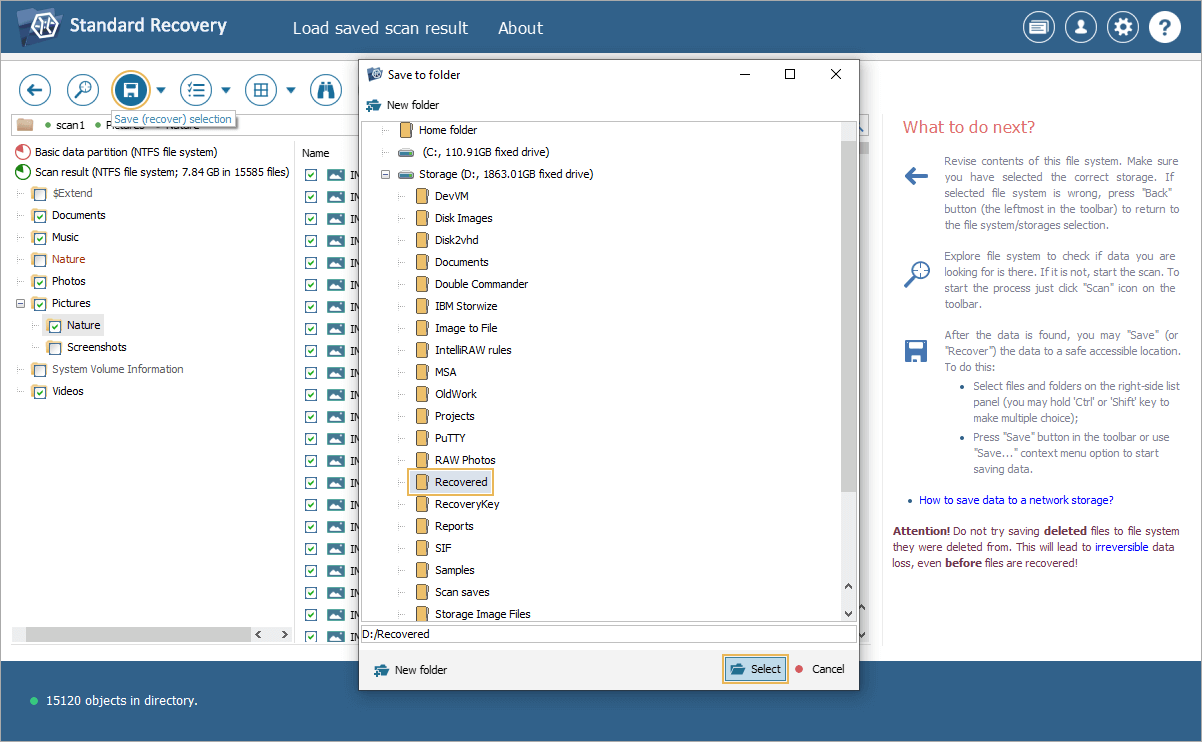
Hint: If you are going to save the recovered data to a network storage, please check the provided guide.
Step 2. Partition formatting
Please be aware that formatting the RAW partition will destroy the data left inside of it. So, you should double-check whether you have recovered and copied all important files before performing this operation.
In Windows
-
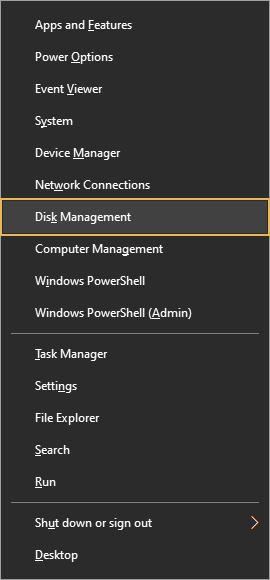
Open the Disk Management utility. You can do this with the right mouse click on the Start menu button or by pressing Windows+X. After that, select Disk Management from the menu.
-
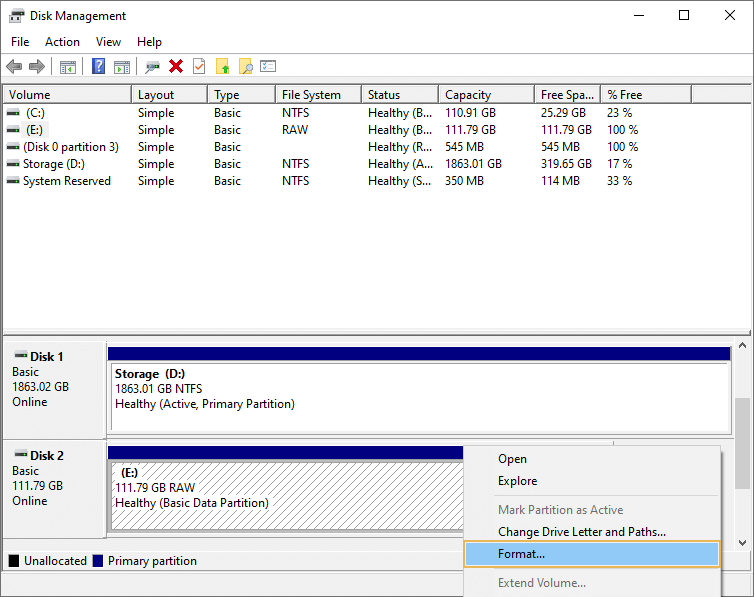
In the opened window, find the partition that is labeled as "RAW" or "Unallocated". Check one more time if this is the correct partition, then open its context menu and select the "Format" option.
-
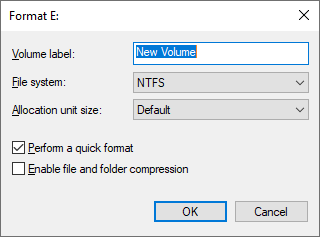
In the opened dialog box, go to the "File system" drop-down menu and choose the desired file system type. You may also specify a name for the partition. Once ready, hit "OK".
-
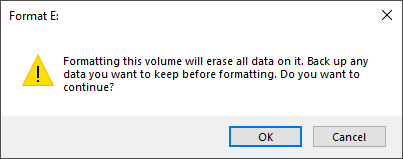
You will get a warning message. Click "OK" once again if you are sure and wait for the process to complete.
In macOS
-
Run Mac’s Disk Utility. For this, you can click on the "Finder" icon in the dock, go to Applications, then Utilities and, after that, open Disk Utility.
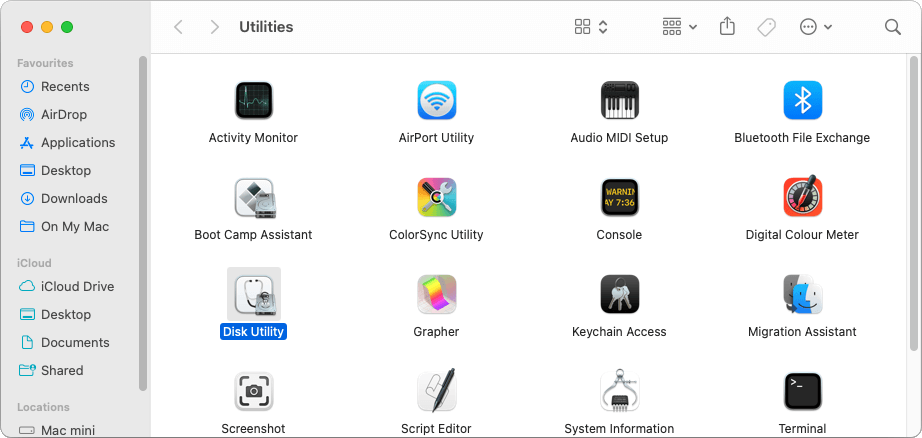
-
In the opened window, navigate to the sidebar and locate the RAW partition. Such a partition may be listed without a recognizable format. You have to click on it and then hit the "Erase" button at the top of the window.
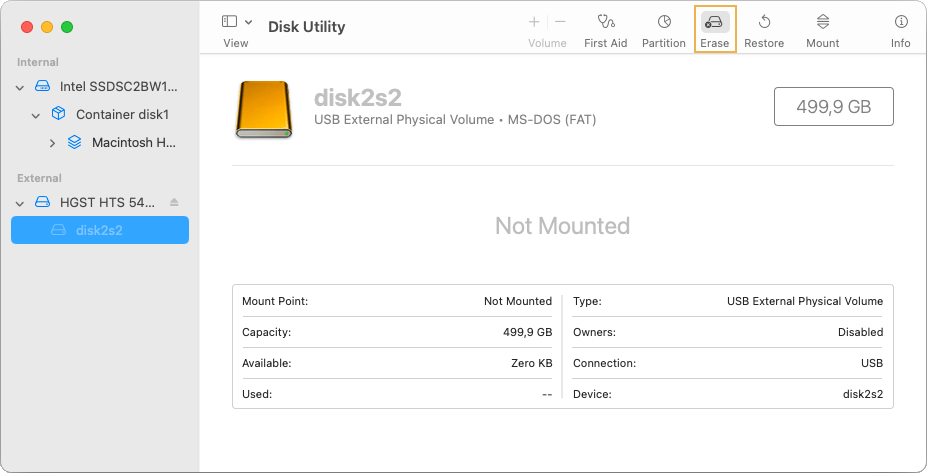
-
In the opened dialog box, choose the desired file system type from the Format dropdown menu. You can also provide a name for the partition using the "Name" field.
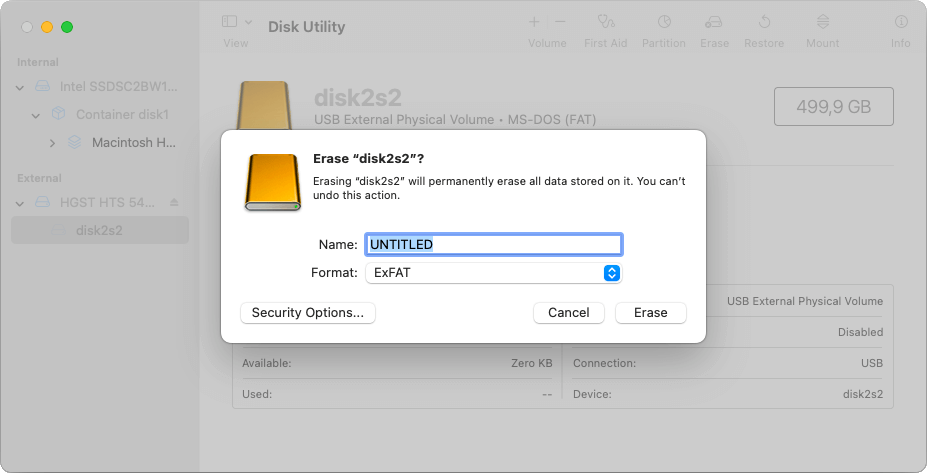
-
Confirm the operation by pressing the "Erase" button. This action will erase all data on the partition. If you are certain, wait for the process to finish.
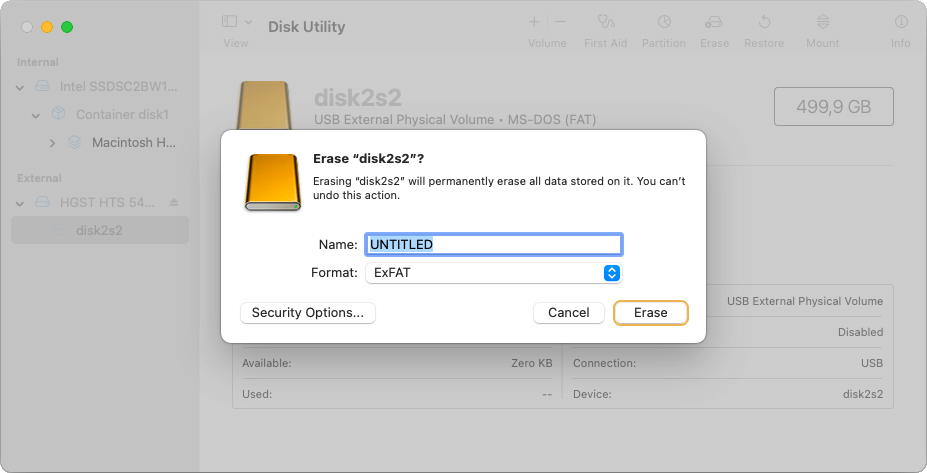
In Linux
-
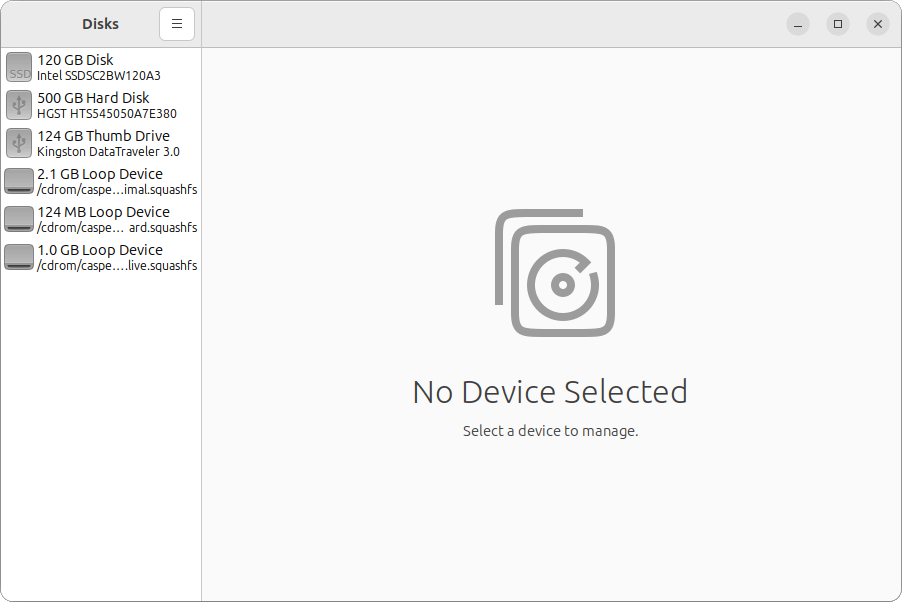
Depending on your Linux distribution, you may use the built-in Disks utility or install GParted for more advanced options. Once prepared, run the respective tool from your applications menu.
-
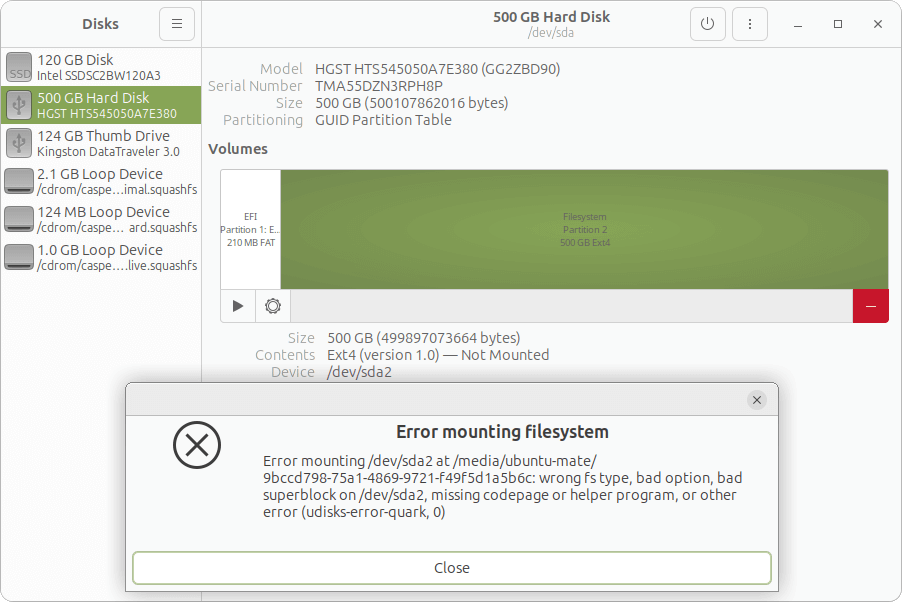
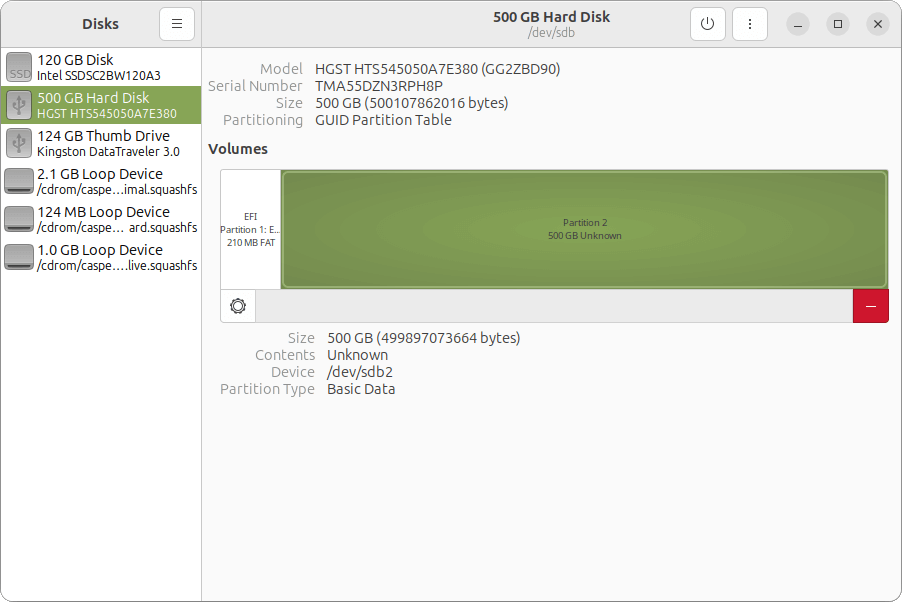
In the utility, look for the RAW partition in the list of available drives. It may contain a damaged file system, without the possibility to mount it.
Or it may simply show up as "Unknown".
-
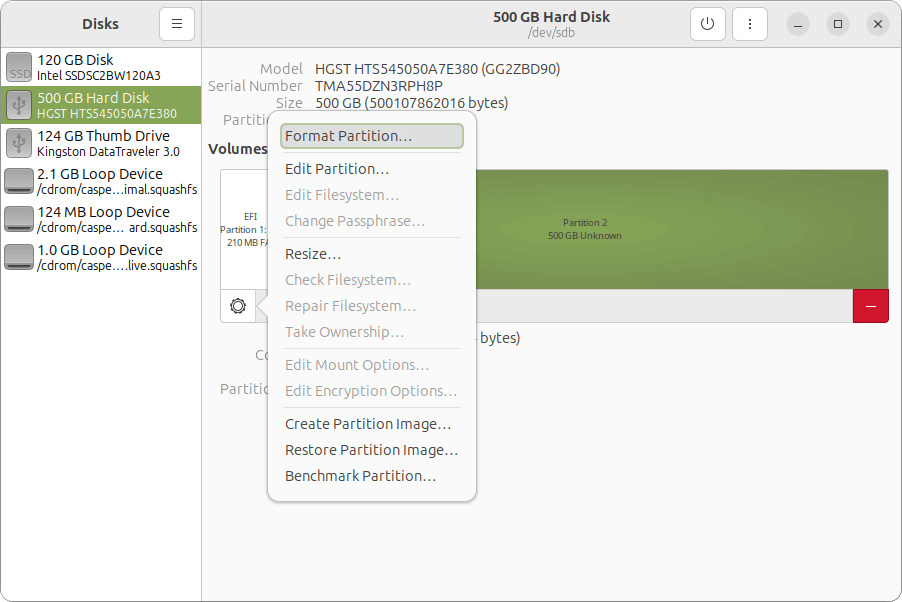
To format the RAW partition in the Disks utility, click on this partition, then press on the gear icon and select "Format Partition". To format the RAW partition in GParted, right-click this partition, choose the "Format to" option, and, after that, select the preferred file system type.
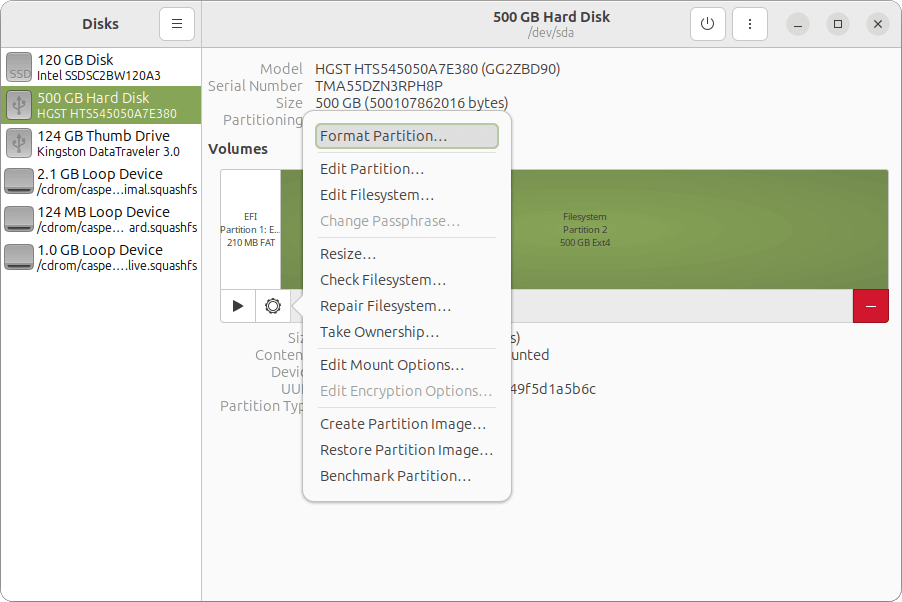
The same steps apply to a partition with an "Unknown" status.
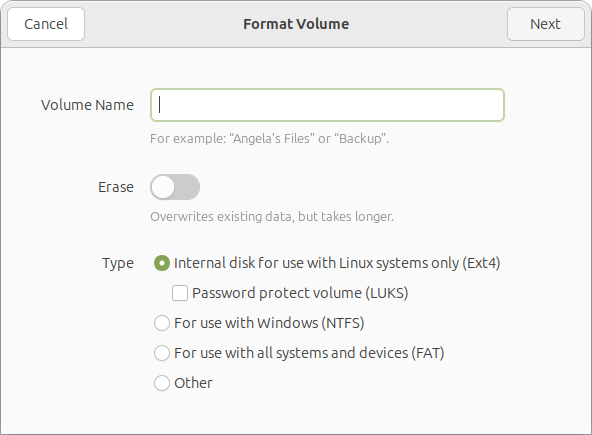
You may also be prompted to configure some additional parameters.
-
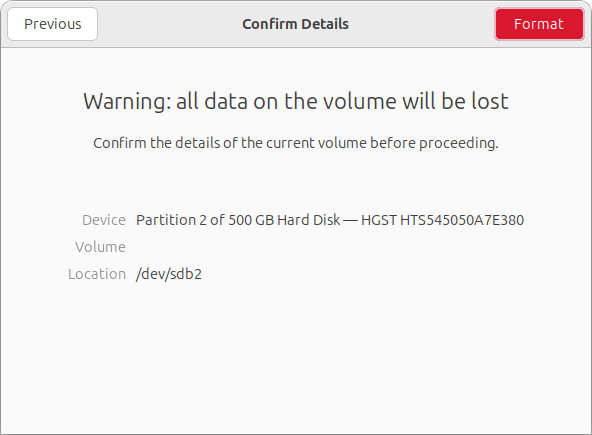
Confirm any warnings that will inform you about data loss caused by formatting. Click "Format" or "OK" to proceed and wait for the operation to complete.
Step 3. Data copying (optional)
After successful formatting, the partition should be accessible and labeled with a file system. If required, you may copy the recovered data back to it. For this, you can use Windows File Explorer, Finder under macOS or your preferred file manager under Linux. Once finished, remember to check if all the necessary folders and files have been transferred successfully.
Now that the RAW partition has been formatted and the proper file system is in place, you can access the restored data as needed or use this partition to store new files.
Last update: November 18, 2024
