How to connect SAS drives to a computer or server using a SAS HBA
SAS (Serial Attached SCSI) surpasses SATA in terms of performance and reliability, so it is often preferred in demanding computing environments like enterprise servers and storage arrays. In general, these two interfaces share many similarities, but they are by far not completely interchangeable. And incompatibility between them may become an obstacle during data recovery from SAS drives: the standard equipment designed for SATA cannot be used for their connection, whereas very few consumer-grade motherboards have native support for the SAS interface. Therefore, a specialized SAS Host Bus Adapter (HBA) may be required to attach SAS drives to such systems for data recovery operations.
The board acts as a bridge between SAS drives and the PCIe bus of the host computer or server, enabling SAS connectivity with high-speed data transfers for multiple storage devices. In this regard, it is also worth noting that SAS HBA cards are not limited to SAS drives alone. This method is equally applicable for connecting SATA drives and proves truly helpful when there are too many of them for direct installation onto the motherboard.
The following article will assist you in preparing the necessary equipment and offer step-by-step guidance on connecting SAS drives via a SAS Host Bus Adapter. Though its primary focus is on SAS drives, the presented information will be relevant for SATA drives as well.
Hint: Please rely on the article on the identification of a drive’s interface type to aid you in determining whether your drive features SAS or some other type of connector.
Warning: The recommendations presented in this article assume that you have adequate skills in handling hardware. Improper actions may result in physical damage to the drive and permanent data loss.
Things to consider when choosing an HBA for SAS connection
A SAS Host Bus Adapter is an integrated circuit board which provides physical connectivity between the computer or server and storage devices operating via the SAS/SATA interface.
The types of connectors found on a SAS HBA may vary, and each of them requires a specific cable that matches its design. Most commonly, there is a combination of internal and external ports to support different storage setups:
-
SFF-8087, also known as "mini-SAS", is an older connector type that allows plugging in internal drive cages or backplanes;
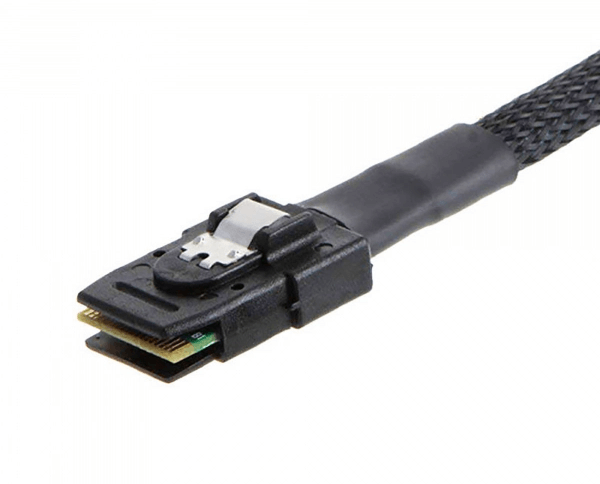
Pic. 1. SFF-8087 mini-SAS internal connector.
-
SFF-8643 or "mini-SAS HD" is a newer high-performance type of connector that is also designed for internal SAS connectivity;
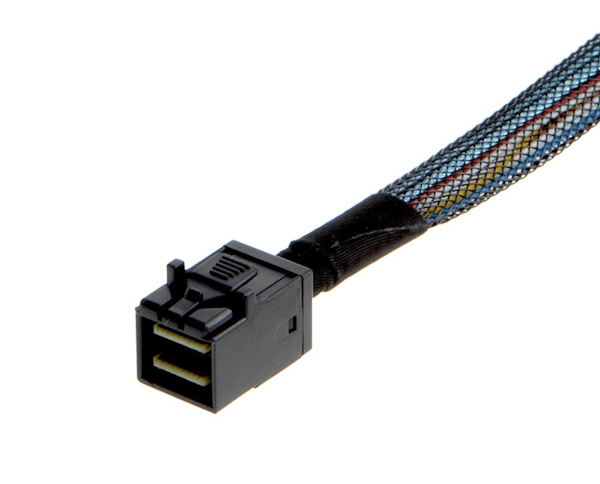
Pic. 2. SFF-8643 mini-SAS HD internal connector.
-
SFF-8088, referred to as "external mini-SAS", enables the connection of external SAS drives, enclosures or expansion units;
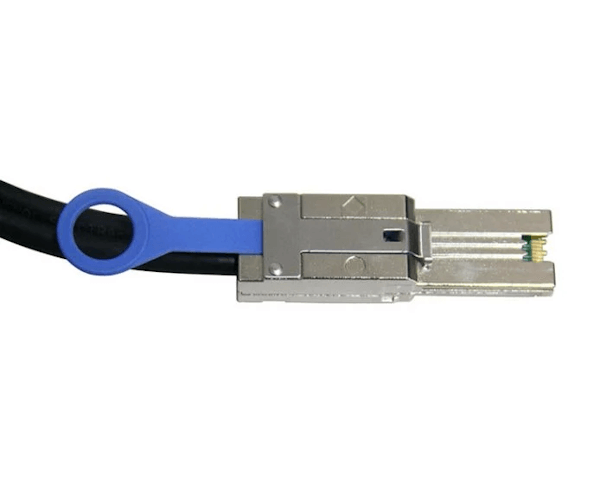
Pic. 3. SFF-8088 mini-SAS external connector.
-
SFF-8644 is a more recent external SAS connector that provides higher data transmission rates.
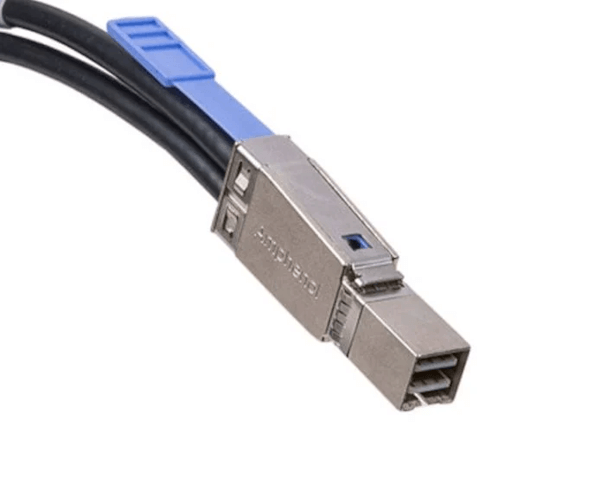
Pic. 4. SFF-8644 mini-SAS HD external connector.
Although these different connector types are mechanically incompatible, they have the same electrical specifications. Therefore, it is usually possible to find special adapter cables that can resolve their mechanical differences, allowing such devices to work with each other without issues.
SAS HBAs are primarily manufactured by Broadcom (formerly LSI) and Adaptec. Examples of different variants of such cards are shown in the pictures below.
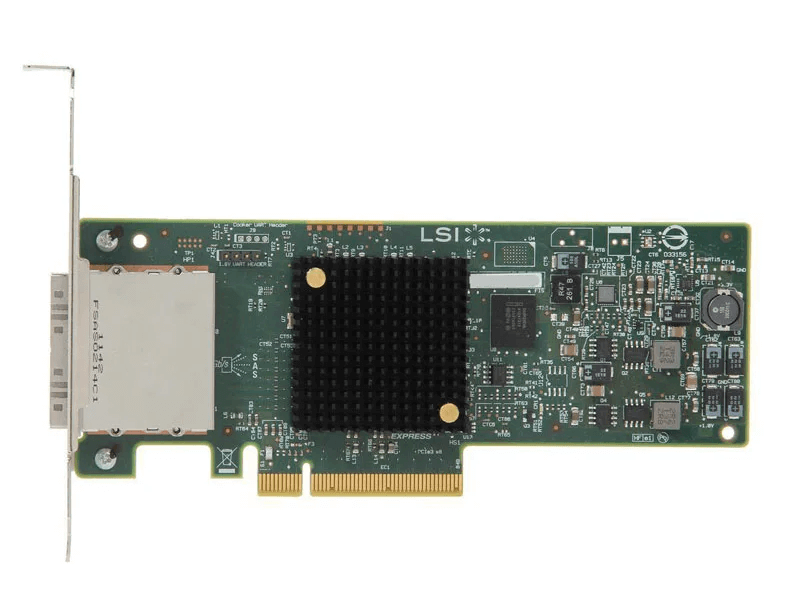
Pic. 5. LSI SAS 9200-8e Host Bus Adapter.

Pic. 6. LSI SAS 9300-8e Host Bus Adapter.
You may use any of them or pick any other model of your preference. Yet, when choosing a SAS HBA for data recovery purposes, several factors should be considered:
SAS version. It is generally recommended to avoid SAS-1 HBAs, as they have limitations that prevent them from addressing drive capacities over 2 TB (in case of a 512-byte block size). A SAS-2 HBA would be a much more acceptable choice. Although somewhat old, they are compatible with a wide range of drives and deliver decent data transfer speeds comparable to SATA, all without the high cost associated with newer cards. SAS-3 and SAS-4 HBAs outperform SAS-2 HBAs in terms of the speed: SAS-3 HBAs support rates of up to 12 Gb/s, while SAS-4 HBAs can achieve 22.5 Gb/s or higher. Such boards may be more suitable if you are dealing with an urgent data recovery task, however, they typically come with a considerable price tag.
Number of ports. A single channel on the SAS HBA (SFF-8088 connector or higher) normally consists of four independent lanes. Thus, each port can host up to four SAS drives connected to it directly or even more when used together with an expander, port multiplier or storage enclosure. However, it's important to note that the port’s bandwidth is shared among the drives attached to it. So, when multiple drives are plugged into a single port, the available throughput gets divided among them, and you will receive slower data transfer speeds.
The number of ports available on the board can vary depending on its model and the SAS generation. SAS-1 HBAs usually have fewer ports compared to later generations, with single or dual-port constructions being most prevalent. SAS-2 HBAs come with a dual-port composition as a usual standard, but some models may offer three or more ports for larger storage setups. SAS-3 and SAS-4 HBAs typically have at least dual-port configurations.
Some SAS HBAs may have a digit in the name that indicates the number of supported data lines, with each port typically handling 4 lines. For example, LSI SAS 9207-8e can manage up to 8 data lines, while LSI SAS 9300-16e – up to 16. The letter at the end of the name denotes the type of connection: "e" means external and "i" means internal.
Compatibility. Having selected a certain HBA model, it's crucial to review the technical requirements provided by its manufacturer for the compatibility with your host computer or server. Refer to the documentation to check the list of supported operating systems and compatible drivers. Also, SAS HBAs typically use the PCIe (Peripheral Component Interconnect Express) interface. Therefore, make sure that your system has a free PCIe slot that matches the PCIe lane requirements of the HBA (e.g., PCIe x8, PCIe x16). Keep in mind that a longer 8x or 16x PCIe slot will be able to accommodate a shorter 1x or 4x card, but a longer card simply won't fit into a 1x slot.
At the same time, some servers may use SAS adapters that are not inserted into the PCIe socket but require a specialized port (e.g., Dell PERC H730 Mini Mono, Dell PERC H710 Mini Mono). In addition, certain controllers are even soldered directly onto the motherboard. In such cases, SATA ports on the motherboard or even SFF-8643 mini-SAS HD ports may be employed to connect the drives.
RAID functionality. RAID controllers or adapters may be able to work as SAS HBAs and also offer SAS ports. However, this is not something they are designed for and using them in such a role can present certain risks. Inherently, RAID adapters create and manage disk arrays, combining multiple attached drives into a single logical device. RAID configuration metadata is usually written to the drives themselves, and may accidentally overwrite the existing data. For this reason, a RAID adapter can be used in place of an HBA only when the card is switched to the Initiator Target (IT) or HBA (non-RAID) mode, which disables the RAID functionality. This kind of switch often involves flashing the card with specific firmware. If the RAID controller/adapter does not support such firmware, it is not recommended to connect any drives to it, as it is very likely to write metadata at the end of the drives, potentially destroying the available data.
On the whole, it is essential to choose an HBA of adequate quality from a reputable maker. A well-designed board can offer better performance, helping to expedite the data recovery process, and will be less prone to malfunctions, reducing the likelihood of disruptions or hardware failures.
What else should be prepared for the procedure?
Before connecting SAS drives to a computer or server using a SAS HBA, you'll have to arrange all the related equipment. First of all, you need to obtain the appropriate cables that will transmit the data between your SAS drives and the SAS HBA device. For this, you can get SAS breakout cables converting each port on the board into four individual connectors for the drives. Some of these cables already include power connectors, obviating the need for separate cables to supply the drives with power.
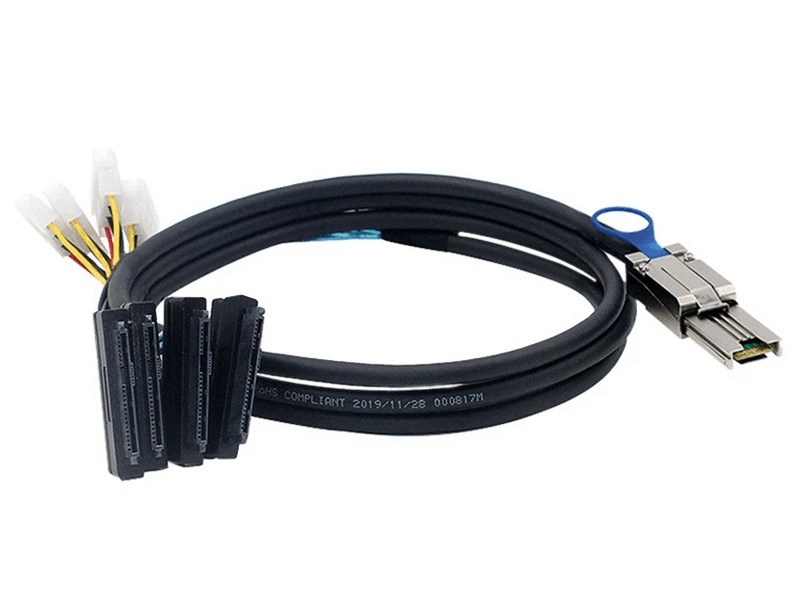
Pic. 7. External miniSAS SFF-8088 to 4xSFF-8482 SAS cable with Molex power.
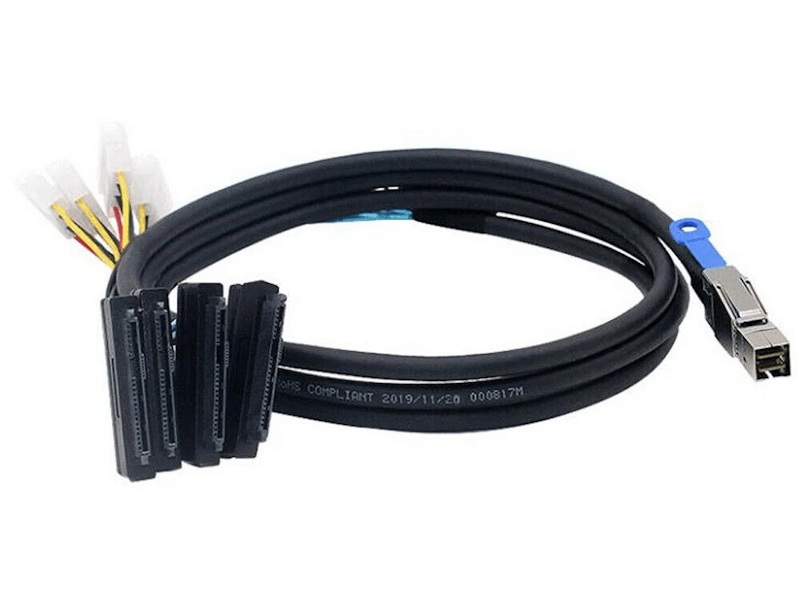
Pic. 8. External miniSAS HD SFF-8644 to 4xSFF-8482 SAS cable with Molex power.
It must be taken into account that the types of miniSAS ports on the SAS HBA may vary depending on the card generation: SFF-8087 or SFF-8643 for internal and SFF-8088 or SFF-8644 for external ports.
Thus, for instance, you can use the breakout cable displayed in Pic.7 with the HBA from Pic.5, and the one in Pic.8 can be paired with the board from Pic.6 respectively.
SAS drives, on the other hand, are usually equipped with SFF-8482 connectors.
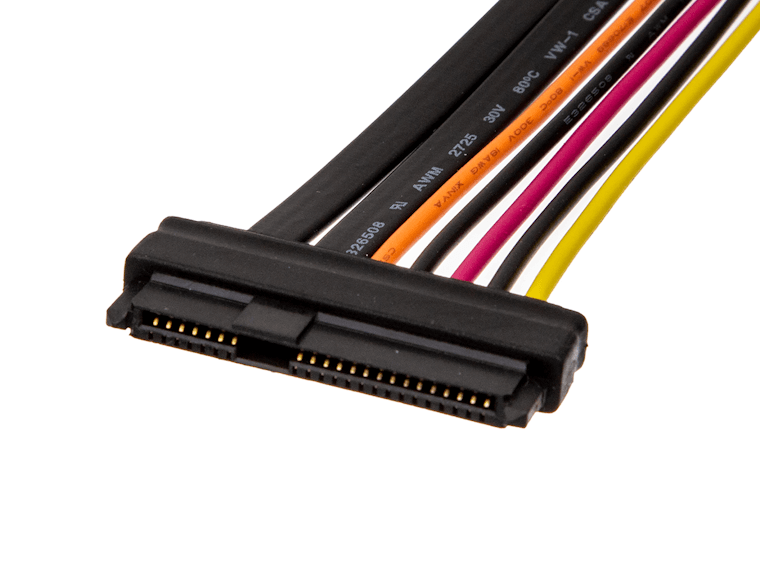
Pic. 9. SFF-8482 SAS drive connector.
Consequently, you need to verify that the selected SAS cables have connectors fitting for the ports on the SAS HBA as well as on the SAS drives.
Furthermore, the interface card will consume a certain amount of electricity from the computer’s PSU. Depending on the model, its power requirements may differ, typically falling within the range of 10-20 watts. However, a potential surge up to 2A (25W) is possible at startup. Moreover, approximately 15 watts are needed for every connected drive. If the PSU is close to its maximum capacity, adding more devices can easily overload it and cause an abrupt shutdown. Therefore, it's best to maintain the total power load no higher than between 80% and 90%. If the resources are insufficient to power all devices, including the SAS drives, you have to prepare an external PSU or even multiple units to enhance power delivery, considering the total power consumption of all components. It is worth mentioning that most of these power adapters have a current rating of 1.5-2A, which is suitable for connecting one drive or two drives at most. Yet, 1.5A adapters are not recommended, as the power delivery may be unstable even for one drive. Instead, you may consider using power adapters with higher ratings, such as 4A, capable of supplying power to more drives.
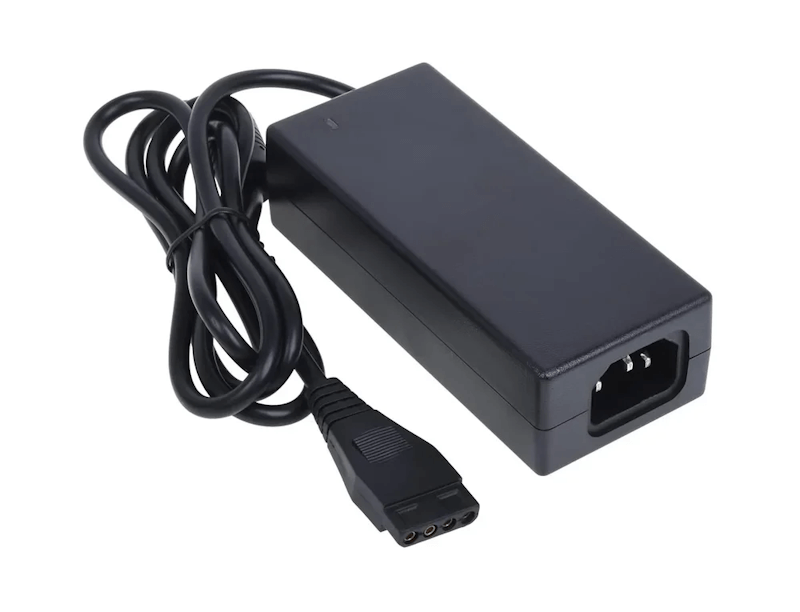
Pic. 10. External PSU 230V to 4-Pin Molex.
When the PSU lacks enough connectors, a Molex Y-splitter power cable will allow you to connect several devices to a single power output.

Pic. 11. 4-pin Molex Male to Dual 4-pin Molex Female Y-Splitter IDE power adapter.
As an alternative to preparing individual cables for each digital medium, it is also possible to get a JBOD disk shelf, especially when you need to attach more than 4-8 drives. Such an expansion enclosure will allow you to connect multiple storage devices to a SAS HBA with the help of just a single cord, making the installation much easier and significantly reducing the cabling clutter. For a relatively affordable cost, it is also likely to come with its own strong power supply unit, ensuring that all connected drives will receive adequate wattage.
Furthermore, SAS Host Bus Adapters tend to generate lots of heat. Standard consumer systems are often not equipped to handle the cooling of components that operate at such temperatures. Therefore, it's important to come up with additional airflow measures that will protect your equipment from overheating. For example, a cooler installed at the top of the PCIe bracket area can help to dissipate heat.
Lastly, to access the hardware internals, ensure you have a Phillips-head screwdriver and an anti-static wristband at the ready. Wearing a wristband will help to protect the inner components from static electricity. Or you may think of alternative anti-static precautions to safeguard the hardware when performing these manipulations.
Connecting SAS drives via a SAS HBA card step by step
Before you begin, please bear in mind that SAS HBA cards are fragile and require careful handling. You should strictly avoid touching the gold-plated connectors – instead, hold the card by the metal mounting bracket or by the edge of the PCB. Also, keep the board in its antistatic bag until you're ready to install it. After that, work on a flat, static-free surface to prevent its damage. Besides, be aware that these installation instructions are provided for reference only and may vary depending on your device model.
- Make the SAS HBA board ready for installation.
Take the interface card out of its antistatic bag and carefully examine it for any signs of damage.
- Prepare your host computer or server.
First, shut down the system and disconnect the power cord from the power supply. Then ground yourself by touching a metal object or pun on an anti-static wristband. Next, extract the screws on the back panel of the computer's case to release the side panel. Slide or remove the panel in order to access the internal components. If your system has a different setup, consult its user manual for precise instructions.
- Inspect the card’s mounting bracket.
Check if the standard PCIe mounting bracket already attached to your HBA card is compatible with your system. If not, use a low-profile PCIe mounting bracket provided in the package.
- Insert the SAS HBA into an available PCIe slot.
Locate an empty PCIe port that matches the specifications of your card, typically found at the bottom of the motherboard. Remove the blank bracket panel on the rear of the case corresponding to the selected PCIe socket. If there's a screw, use a screwdriver to remove it. Then carefully plug the interface card into the PCIe slot, ensuring that it fits properly and doesn't obstruct other components.
Warning: HBA boards are designed to take advantage of the robust cooling systems found in servers and typically come with a very simple cooling mechanism, like a heat sink (radiator), to manage the heat they produce during operation. However, consumer computers generally lack such advanced cooling capabilities. Therefore, when installing a SAS HBA in a regular computer, you must ensure additional cooling for the board. Without adequate cooling, the HBA can overheat, and continuous exposure to high temperatures can damage the component, causing its failure.
- Attach the HBA bracket to the computer’s case.
Secure the HBA mounting bracket to the case using a screw or other appropriate methods, depending on the design of your chassis.
- Verify that the connected HBA board is recognized and functioning properly.
Power the computer back on and start the system. Check if the OS detects the connected card, for example, by using Device Manager. For this, you have to ensure that it is listed in "Storage Controllers" section. If the drivers for this HBA are not installed or when there are hardware issues, the adapter may appear in the "Other Devices" section with a yellow warning icon. This icon indicates that it is not functioning correctly. If needed, install the drivers required for your SAS HBA to operate as intended.
- Connect your drives to the HBA card.
SAS HBAs are designed to support hot-swapping, allowing you to insert or remove drives from the board while it's operating. Moreover, the "hot detection" feature enables the system to spot the connected drives without the need for a system restart.
Start by attaching one end of the SAS breakout cable's miniSAS connector to the miniSAS port on the interface card. Then plug the SAS connectors on the other end of the cable into the ports on the back panel of the SAS drives. Finally, use a free power connector on the same cable to power the drive from the PSU.
In case you’ve opted for a JBOD disk shelf, connect this enclosure to a reliable power source and then attach it tho the SAS HBA using the appropriate SAS cable. After that, turn it on and ensure that all the housed drives are operational.
- Confirm that the drives are detected.
To make sure that the drives have been detected, you can run Disk Management and look for the drives in the list of storage devices. If they aren't visible, shut down the system, unplug the computer and examine the contacts.
Last update: June 21, 2024