Data recovery from Buffalo's TeraStation Quad NAS
Buffalo Technology provides a wide range of NAS solutions for personal, home and small office use. These devices offer space-efficient shared storage with access over a local network. Unfortunately, despite the enhanced reliability of modern network-attached storages, they still remain exposed to failures and data loss.
This article describes the process of data recovery from the popular 4-disk Buffalo TeraStation solution of Buffalo Technology using UFS Explorer RAID Recovery and can also be utilized during data recovery from LinkStation Quad NAS.
Getting started
Warning! The instructions below assume that you have basic skills of manipulating hard drives. Any physical damage to the storage media may cause permanent data loss. If you are not completely sure about your competence in working with the internal components of the hardware, please, contact a provider of professional data recovery services.
The most common causes of data loss from NAS include:
- The failure of one or several hard drives;
- Electrical damage or overheating of the appliance;
- Software issues or faulty firmware updates;
- Accidental deletion of important information due to user mistakes.
The chances for successful data recovery depend on such factors as the circumstances that lead to the loss of data and the configuration employed by the NAS unit:
- RAID 5:This configuration is the most widely-used one. Data is distributed across the drives and is protected with single parity. RAID 5 ensures good operational speed and allows using 3/4 of storage capacity. The information remains recoverable even without one drive.
- RAID 10/0+1:Data is distributed across one pair of drives and is mirrored on the second pair of drives. RAID 10/0+1 ensures good operational speed, high reliability and enables the use of 1/2 of storage capacity. Data remains recoverable after the failure of one drive; if two drives fail simultaneously, the chances for data recovery are close to 67%.
- RAID 0:Data is distributed across the drives. This configuration ensures maximum operational speed and maximum use of storage capacity. The failure of one drive results in the loss of all data.
- JBOD: Data is spanned across all disks. This ensures the ability to use the full storage capacity and quite good performance. Failure of one drive results in the loss of all data.
- Multi-part storage: Each drive has its own dedicated file system which is mounted under a dedicated 'share' folder. Failure of one drive results in the loss of the 'share' folder on this disk.
In case of hardware failure other than the failure of a hard disk, firmware failure or a faulty firmware update, the data remains recoverable regardless of the NAS configuration. NAS re-configuration usually causes partial data loss from previous configurations.
Hint: More detailed information as to the prospects for successful data recovery can be found in the articles on data recovery specificities of different OS and chances for data recovery.
SysDev Laboratories offers the UFS Explorer software products for smooth do-it-yourself recovery of data from NAS units of Buffalo Technology. UFS Explorer RAID Recovery is specially geared for work with RAID systems of various configurations and is an optimal solution to the problem of data loss from NAS devices of different manufacturers. UFS Explorer Professional Recovery deploys a professional approach to data recovery and features an embedded toolset for efficient RAID reconstruction and recovery, along with numerous other instruments and possibilities. Each of the utilities applies powerful mechanisms, allowing you to achieve maximum recovery results and is 100% reliable, guaranteeing the complete safety of the lost NAS data.
Preparing the hardware
Software-based data recovery from TeraStation can be carried out when:
- All the hard drives of the NAS are operable;
- One drive failed in RAID 5 or RAID 10 (0+1);
- Two drives failed in RAID 10 (0+1).
In case of a multi-part storage, partial recovery after the failure of a drive is also possible.
Hint: All the basic RAID concepts are described in the peculiarities of data organization on RAID.
To make the hard drives ready for the actual data recovery, you will need to complete the following steps:
- Shut down your NAS.
- Extract the drives through the front panel: open the door and eject the enclosures.
Hint: If you are not sure how to remove the NAS drives correctly, please, refer to the video tutorial.
- Mark the order of drives using paper stickers or a soft ink marker.
- Connect the intact drives to the computer.
Hint: You can plug the disk into the motherboard of the computer or сonnect the drive externally using a USB to SATA/IDE adapter as described in the instructions.
Hint: Please familiarize yourself with the article to choose the right OS for NAS recovery.
When the NAS drives are successfully connected to a PC, you can run the software and start data recovery.
Data Layout
4-disk Buffalo TeraStation and LinkStation Quad have the following data layout:
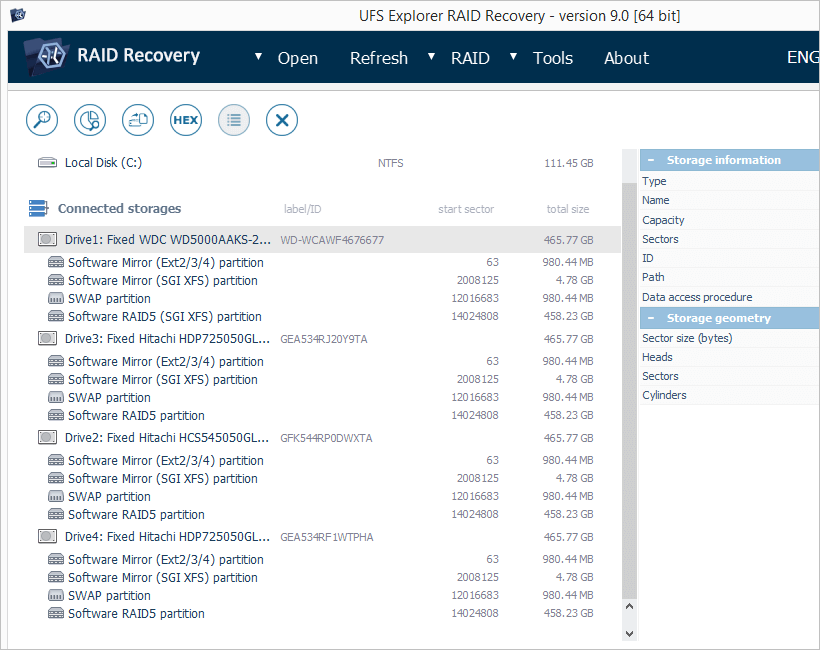
Figure 1. NAS drives in UFS Explorer RAID Recovery.
- The actual view depends on software version and edition;
- The actual sizes of drives depend on the NAS model;
- The identified partitions depend on the NAS model and the software version and edition;
- An extended partition (a partition with sub-partitions) is a container and is not mentioned further on.
Each NAS drive has the same structure of the partitions:
- Boot firmware partition. This partition contains files which serve to boot the embedded custom Linux OS (there is no user data here);
- Firmware partition. This partition contains system files of embedded Linux such as executables, configurations, etc. (there is no user data here);
- Swap partition. This partition is used by embedded Linux OS to extend RAM (memory swapping);
- Data (storage) partition.This partition contains user files. For RAID configurations data partitions of each drive are combined into a software RAID virtual device.
Note: Depending on the retailer and the model, NAS can contain from two and up to four partitions on each drive. The Data partition is the largest one (takes up 95-99% of the entire disk space) and has no sub-partitions.
For a multi-part storage or RAID 1 a valid XFS file system will appear on the data partition of each NAS drive. For SPAN or striped RAID (RAID 0, RAID 5, RAID 10) some data partitions will be displayed as 'RAW partition' since they contain no valid start of the file system.
Data Recovery
Before starting data recovery make sure that the order of NAS drives is correct. Please refer to How to identify NAS drives order from XFS NAS for instructions.
Multi-part storages and the RAID 1 configuration allow for data recovery without RAID reconstruction. The XFS file system is detected on the data partition of each drive. If the file system is not detected on RAID 1 or a multi-part storage, you'll need to reconstruct the file system. To do this run a scan for lost data enabling the XFS file system.
To recover data from other RAID configurations follow the steps below:
Step 1. Open the RAID builder dialog
1. Click the 'Build RAID' button to invoke RAID Builder:

Figure 2. RAID builder tool icon in UFS Explorer.
2. This will display a RAID builder dialog:

Figure 3. RAID Builder tool in UFS Explorer.
Step 2. Reconstruct RAID.
-
RAID 5:
RAID 5 is usually the default RAID configuration for 4-disk Buffalo TeraStation and is offered as the default setting in UFS Explorer.To reconstruct RAID 5:
- Add the data partitions of each NAS drive to the list of components in the correct order. The first data partition will be SGI XFS, the other ones – RAW partitions;
- If one of the drives is missing, press the 'Placeholder' button to substitute the missing drive. A placeholder takes the place of the missing drive in the sequence of drives;
- Adjust the stripe size, if required (Buffalo products use the default 64 KB stripe size);
- Press 'Build this RAID'.
-
RAID 0:
The RAID 0 configuration allows for fast operations and maximum use of storage capacity.To reconstruct RAID 0:
- Switch the 'RAID level' to 'RAID 0 (Stripe set without redundancy)';
- Add the data partitions of each NAS drive to the list of components in the correct order. The first data partition will be SGI XFS, the other ones – RAW partitions;
- Adjust the stripe size, if required (Buffalo products use the default 64 KB stripe size);
- Press 'Build'.
-
RAID 10:
The RAID 10 configuration provides for fast operations, redundancy and use of half of the storage capacity.To reconstruct RAID 10:
- Switch the 'RAID level' to 'RAID 0 (Stripe set without redundancy)';
- Add any of the SGI XFS data partitions as the first component, any of Raw data partitions – as the second one (use 2 partitions only);
- Adjust the stripe size, if required (Buffalo products use default 64 KB stripe size);
- Press 'Build this RAID'.
-
JBOD (span):
JBOD is a non-redundant configuration that has quite good performance and enables the use of full storage capacity.To reconstruct JBOD:
- Switch the 'RAID level' to 'Span of storages (JBOD with spanning)';
- Add the data partitions of each drive to the list of components in the correct order. The first data partition will be SGI XFS, the other ones – RAW partitions;
- Press 'Build this RAID'.
As a rule, the size of a data partition doesn't fit to the size of a JBOD component. Before you assemble JBOD, you will need to adjust the size of a data partition manually. This operation requires detailed analysis and is not described in this article.
Step 3. File system detection.
After assembly RAID appears as a Virtual RAID in the tree of storages. This storage contains one partition with the SGI XFS file system.
If the partition is displayed as a RAW partition, RAID was assembled with a wrong configuration or order of drives. Please check the order of drives.
Double-click the partition to open it in UFS Explorer. If the software warns about errors, RAID was assembled with a wrong configuration. Please check the stripe size and the order of drives.
If the file system opens with a default empty 'share' folder without your files, your device seems to have formatted the file system. In this case:
- Right-click the partition and select the 'Scan for lost data' option;
- Select the 'SGI XFS' file system type;
- Enable the 'IntelliRAW™ scan' for in-depth search;
- Run the scan;
- After the scan is completed, you will find all recovered files in UFS Explorer.
Note 1: If the loss of data was caused by NAS failure, your data gets accessible immediately after RAID assembly. No data recovery scan is required. If UFS Explorer warns about reading errors or doesn't show all of your files, check the RAID configuration.
Note 2: If the loss of data was caused by accidental deletion of files, all the remaining data is displayed in UFS Explorer immediately after RAID assembly. To recover the lost files select 'Scan for lost data' in the context menu of SGI XFS partition of Virtual RAID in UFS Explorer.
Note 3: In case the loss of data was caused by NAS re-initialization and UFS Explorer reads the NAS correctly, but it contains only default folders, scan the XFS file system for data recovery.
Note 4: In case the loss of data was caused by both NAS re-configuration and re-initialization and you can see empty SGI XFS on RAID 0 instead of the expected files on RAID 5, you may fail to recover the lost data correctly. It is recommended to use professional data recovery services.
Final notes
In case of any sign of physical damage to the drives, it's strongly recommended to bring your NAS to a specialized data recovery laboratory in order to avoid data loss. Yet, if you have the appropriate skills to perform the procedure, please first familiarize yourself with the peculiarities of work with defective disks in UFS Explorer.
If you feel unsure about conducting data recovery operations from your NAS by yourself or not confident about RAID configuration in your NAS, feel free to use professional services provided by SysDev Laboratories.
Last update: August 10, 2022