How to recover data from Intel Optane
Intel Optane is an effective storage solution designed to improve the performance of desktop and laptop computers. Yet, as it often happens, more elaborate technologies entail greater risks that things may go wrong after all. While ordinary Optane-based SSDs usually do not present any additional challenges, Optane Memory products are way more tricky as regards data recovery. In essence, such a storage consists of two distinct devices – a smaller Optane cache and a more capacious regular SSD or HDD. Both operate jointly to form a single smart memory system. With that said, when the vital logical vital link between these inseparable parts breaks, the whole unit then becomes inaccessible, together with all the data it contains. System errors, malware attacks, hardware problems and other unforeseen issues may also affect the valuable files residing on this composite storage. Fortunately, in the majority of those cases, UFS Explorer can come to the rescue of lost information. Just follow the guidelines provided in this article to be able to cope with data loss from Intel Optane Memory.
Peculiarities of data recovery from Intel Optane Memory
As explained in The basics of Intel Optane technology, the Intel Optane Memory device may be represented by one of these configurations:
-
an individual Optane cache drive that operates in combination with any other traditional SATA hard drive or SSD;
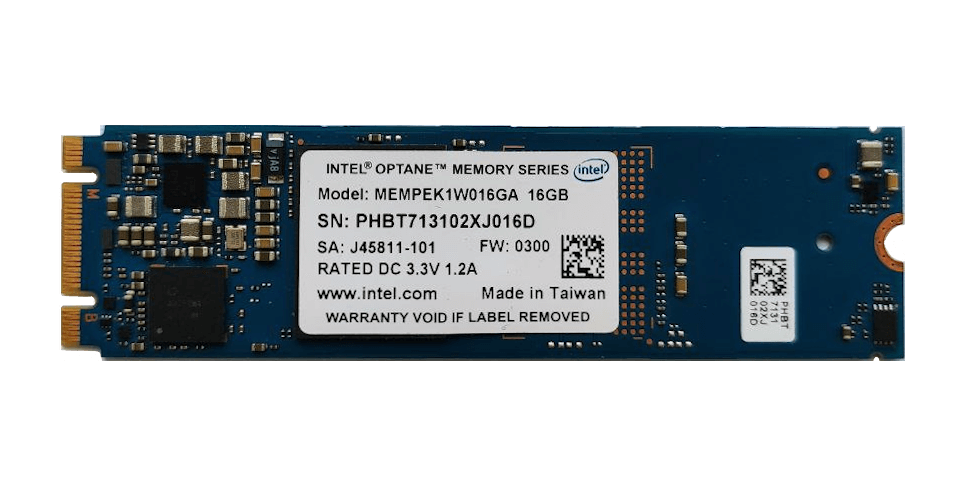
Pic. 1. Intel Optane Memory cache drive
-
a hybrid storage module that hosts an Optane cache drive and a NAND-based solid state drive on a singe M.2 NVMe board.
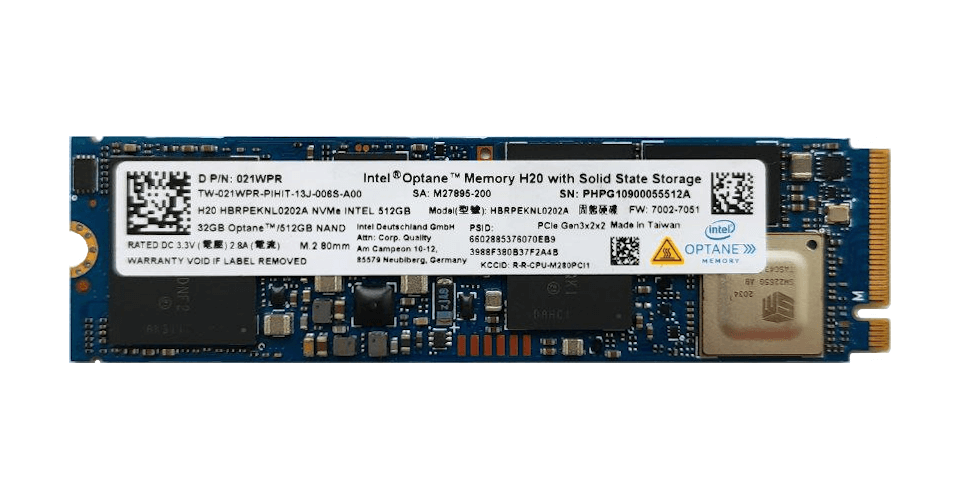
Pic. 2. Intel Optane Memory hybrid drive
The main complication when dealing with any of these types lies in the fact that its parts are interconnected and cannot be separated. Though most of the data is stored on the HDD or NAND SSD, using the primary storage alone typically delivers no positive results. The reason for this is that certain crucial file system's metadata may be partially stored on the Optane drive. Consequently, when it is missing from the assembly, the entire file system will turn out to be corrupted. Moreover, individual user files or their portions may reside solely on the Optane part, which makes it impossible to bring them back without this drive. No one can say with certainty where any given item was located, as it is something decided exclusively by the algorithms of Intel Rapid Storage Technology.
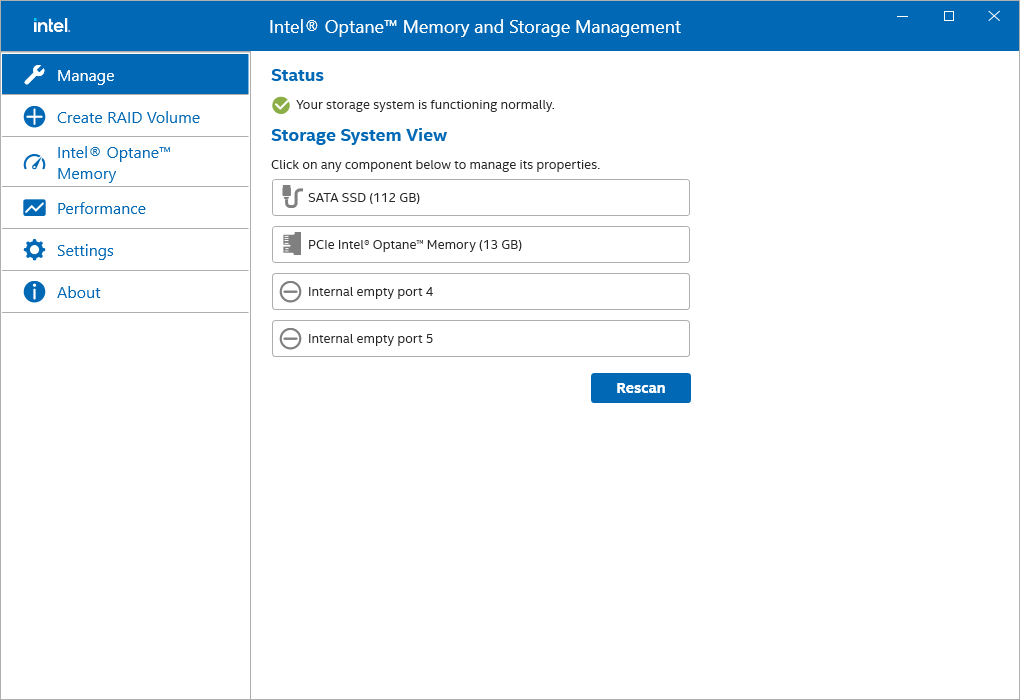
Pic. 3. Intel Rapid Storage Technology utility.
In view of this, it is also important to refrain from making any changes to the storage configuration before you are sure that data recovery has been completed. Trying to fix any encountered issues, even via the native Intel RST application, may lead to unexpected behavior or even wipe the information present on the Optane cache drive.
Secondly, even when both parts are available, data recovery software must be able to identify them and associate into a single unit analogous to RAID 0. When analyzing them separately without the necessary transformation, it is highly unlikely to obtain any intact data.
Furthermore, some of these storages come with the BitLocker encryption enabled by default. Thus, the program must support this technology and allow decrypting them for further processing.
And the last but not the least, functioning of Intel Optane Memory is tightly bound with the system's hardware specifications. If transferred to another computer with a different setup, it might not be recognized properly, and data recovery in this case will not work as expected. That is why it would be less troublesome to perform it on the original computer the module belongs to. It is also possible to create disk images for both parts of the device and then continue further manipulations on another PC. Afterward, the disk images can be loaded into a data recovery utility and used for operations in place of the source storage. If circumstances so warrant, another machine can be used as well, but in this case, the compatibility of its hardware with the respective type of Intel Optane Memory must be ensured.
All things considered, the best way to recover files from Intel Optane Memory is to use UFS Explorer Professional Recovery. This proficient software is capable of recognizing the cache partition available on Optane drive or its disk image and enables extraction of valid data by using proper techniques in order to apply it to the primary storage. Besides, it works with BitLocker as well, which will come in handy in case the storage has been encrypted. Let’s move on to the procedure itself and see this feature in action.
Preparation for the procedure
Before getting to data recovery from Intel Optane Memory, first of all, you need to assess the situation and decide on the strategy to be adopted: the specifics of preparation steps will depend on whether the Intel Optane Memory storage will be relocated to another computer.
-
If the original computer will be used for data recovery:
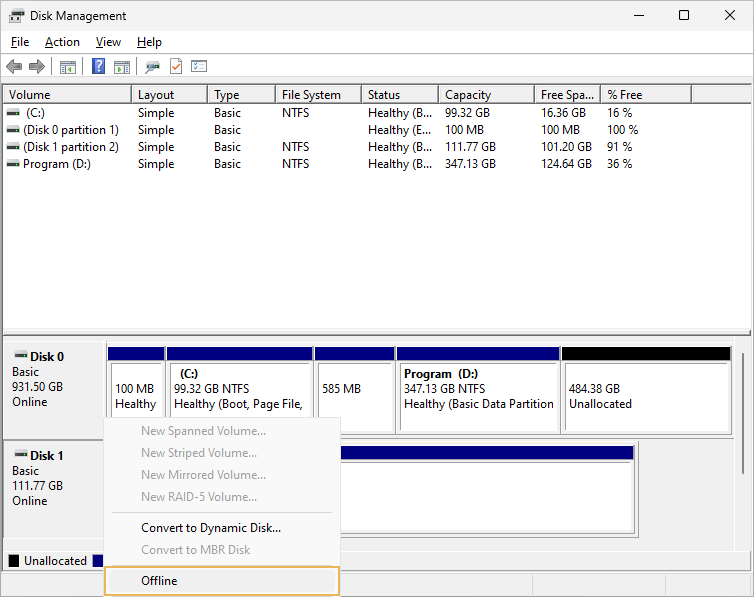
This is the path of least effort, since it doesn’t require the selection of appropriate hardware. However, if the storage keeps operating, any further writes to it can potentially damage the data and even make it unrecoverable. Thus, it is highly recommended to make it inaccessible for the operating system. This can easily be done in Windows through Disk Management:
-
Right-click the Start button and select "Disk Management" to launch the tool. Alternatively, you can press Win + X and choose "Disk Management" from the menu.

-
Locate the drive that corresponds to Intel Optane Memory in the lower section of the Disk Management window.
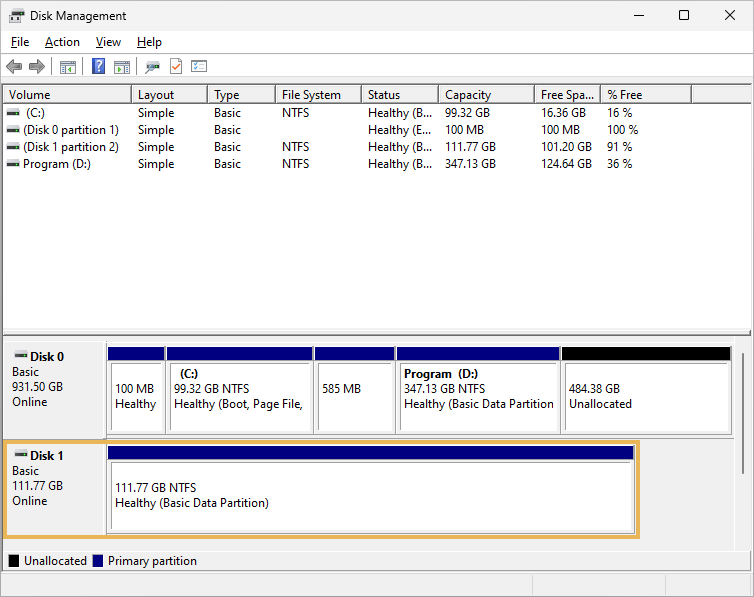
-
Right-click this drive and select "Offline" from its context menu. Ensure that you’ve chosen the correct drive to avoid bringing any other drive offline by accident.
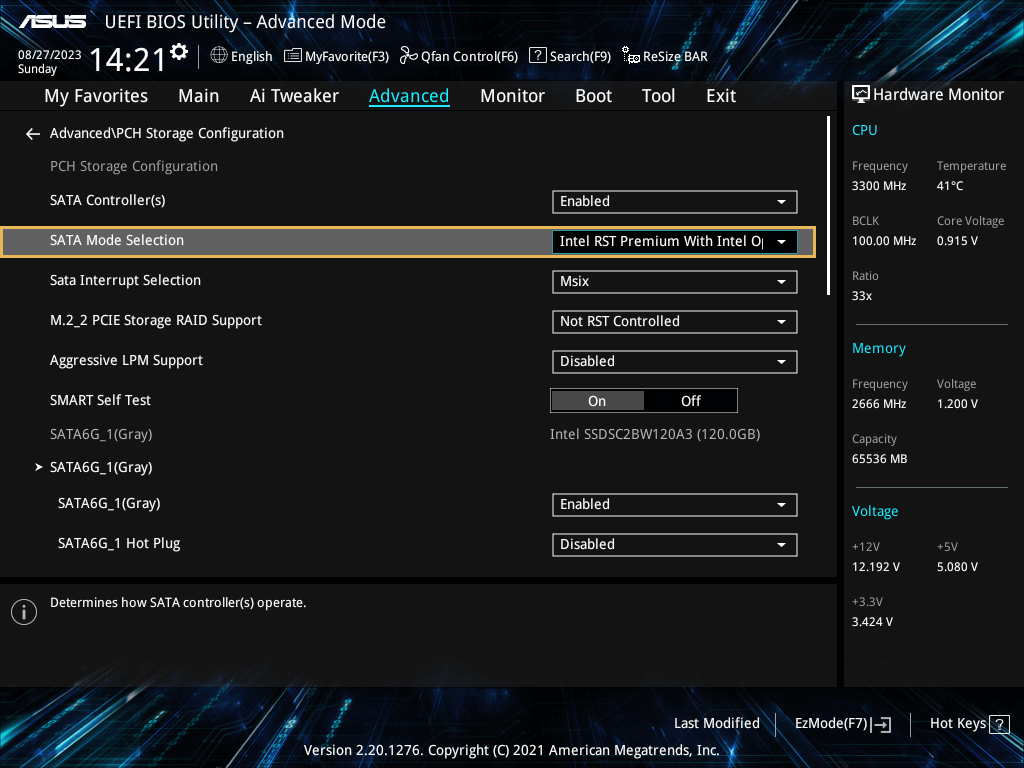
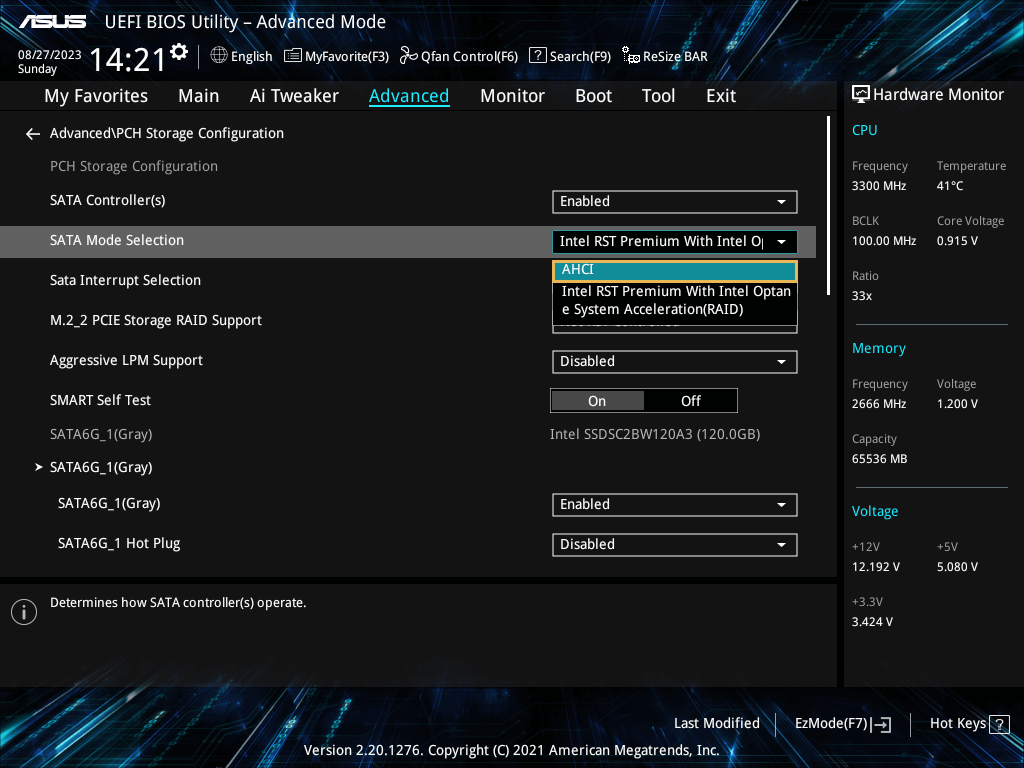
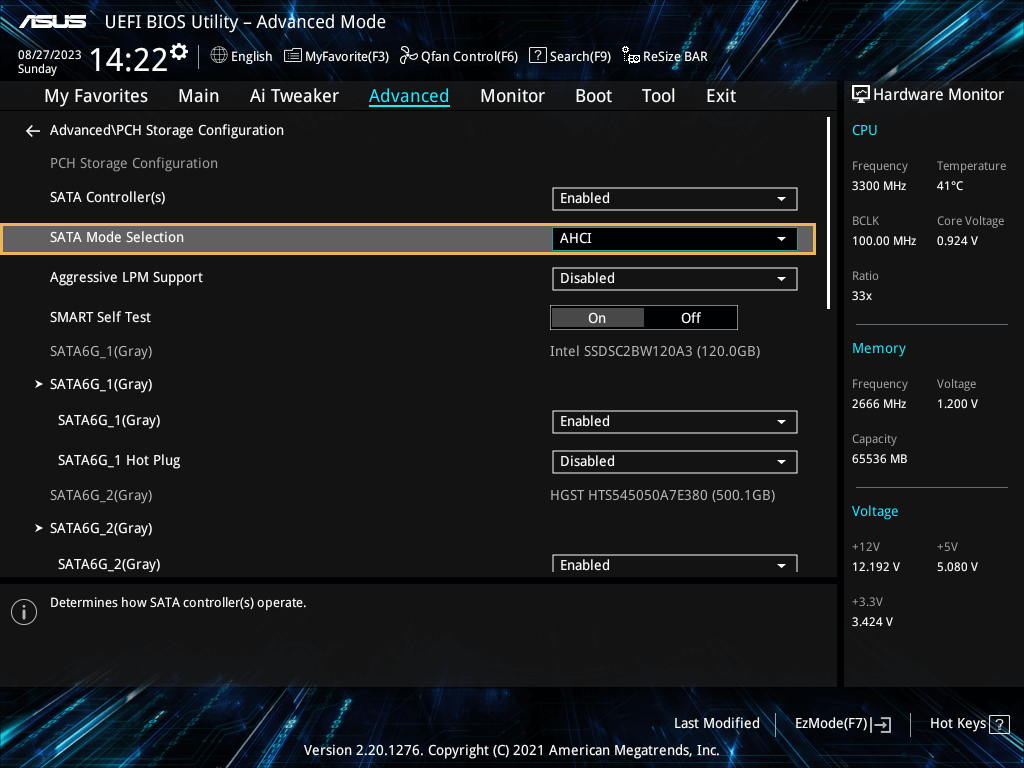
In case you prefer to boot from Linux and keep on working in this environment – for instance, it may be installed as your second OS or you want to use UFS Explorer Backup and Emergency Recovery CD – the "RAID" or "Intel RST" mode must be disabled in the system BIOS/UEFI settings. Otherwise, Linux will not detect the Optane Cache drive, only the primary HDD or SSD will show up. To ensure correct recognition, enter the BIOS/UEFI setup using the method suitable for your machine and locate the SATA mode setting within the SATA configuration section. Change it to "AHCI" if it is set to "RAID" or "Intel RST".
The screenshots below are provided for illustrative purposes, since the procedure may differ for each specific motherboard model. You may read the documentation supplied with your motherboard if you need exact instructions for this task.
After that, Linux should map the parts of Intel Optane Memory as distinct drives.
-
If a new auxiliary computer will be employed for data recovery:
Transferring an Intel Optane Memory module to another computer is not always straightforward. For it to yield the expected results, the specific hardware requirements of such modules must be taken into account. That being so, it is also impossible to connect them via adapters or enclosures designed for average M.2 NVMe SSDs.
The computer's equipment must be compatible with the given Intel Optane Memory configuration. You will need to check for correspondence of the Intel processor generation, motherboard chipset and the type of M.2 slot. The latter must explicitly support Intel Optane Memory. If the machine provides several M.2 sockets, not all of them are necessarily suited for the module. You will need to choose the one labeled for Intel Optane Memory. It is also noteworthy that the mentioned specifications are not the same for different Intel Optane Memory products.
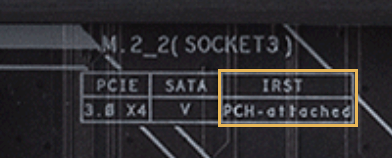
Pic. 3. Intel Optane Memory M.2 slot.
Another stumbling block is that, when Intel Optane Memory is attached to a compatible system, the OS may pick up and attempt to assemble the storage unit, whereas this often leads to errors and even poses the risk for data corruption. Given this fact, it is advisable to use an operating system that lacks the support for Intel Optane Memory, for example, a Linux distribution.
If you are going to use Windows instead, it will be a good idea to turn off the "RAID" or "Intel RST" mode in BIOS/UEFI, so that Windows should not detect the storage automatically and make any modifications to its settings. For this, access BIOS/UEFI the way it is done for your specific motherboard, look for a section related to the SATA configuration and change the SATA mode to "AHCI" or other appropriate option.
Note: If Windows does not show both parts of Intel Optane Memory, but they are displayed in BIOS/UEFI, try using UFS Explorer Backup and Emergency Recovery CD or any other bootable storage medium with live Linux OS to create images of these components and then proceed working with them under Windows.
How to recover data from Intel Optane Memory
Having finished with preparation, you can employ UFS Explorer Professional Recovery and the following instruction to restore your files from Intel Optane Memory:
-
Ensure that both components of the unit are installed into compatible slots on the motherboard.
Attach the Optane cache and the primary HDD or NAND SSD to the machine. In case of a single hybrid module, see to it that the slot can provide correct reading for both channels on the device. When one of the parts is lacking, unfortunately, there is very little chance to obtain intact files. As an alternative, you may use disk images instead of physical drives.
Hint: Please read the article if you want to learn about different ways and means for connecting drives to a computer.
-
Install UFS Explorer Professional Recovery and launch the utility.
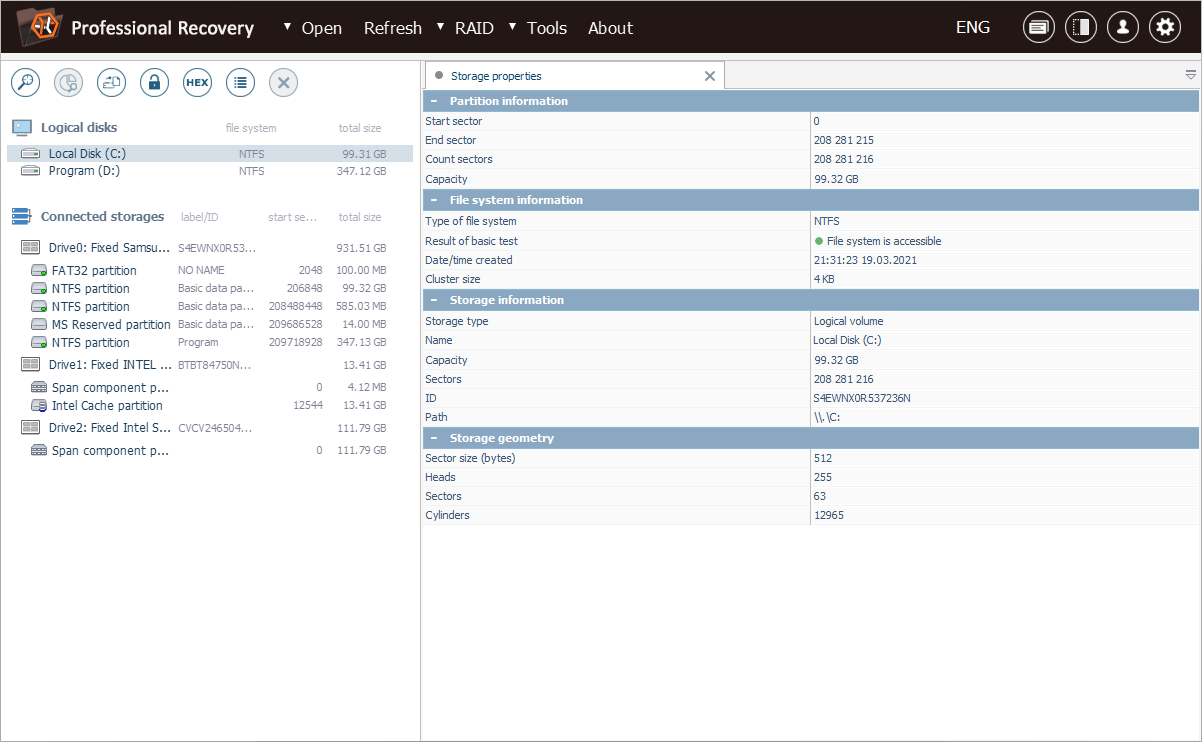
Run the program with administrative privileges and, if necessary, adjust its settings. The connected drives appear automatically among other detected storages in the left pane of the main window. However, if you are going to employ disk images, you have to load them manually via the "Disk image or virtual disk" option from the "Open" menu.
Hint: If you have any difficulties with the installation of the utility, please refer to the installation manual for UFS Explorer Professional Recovery.
-
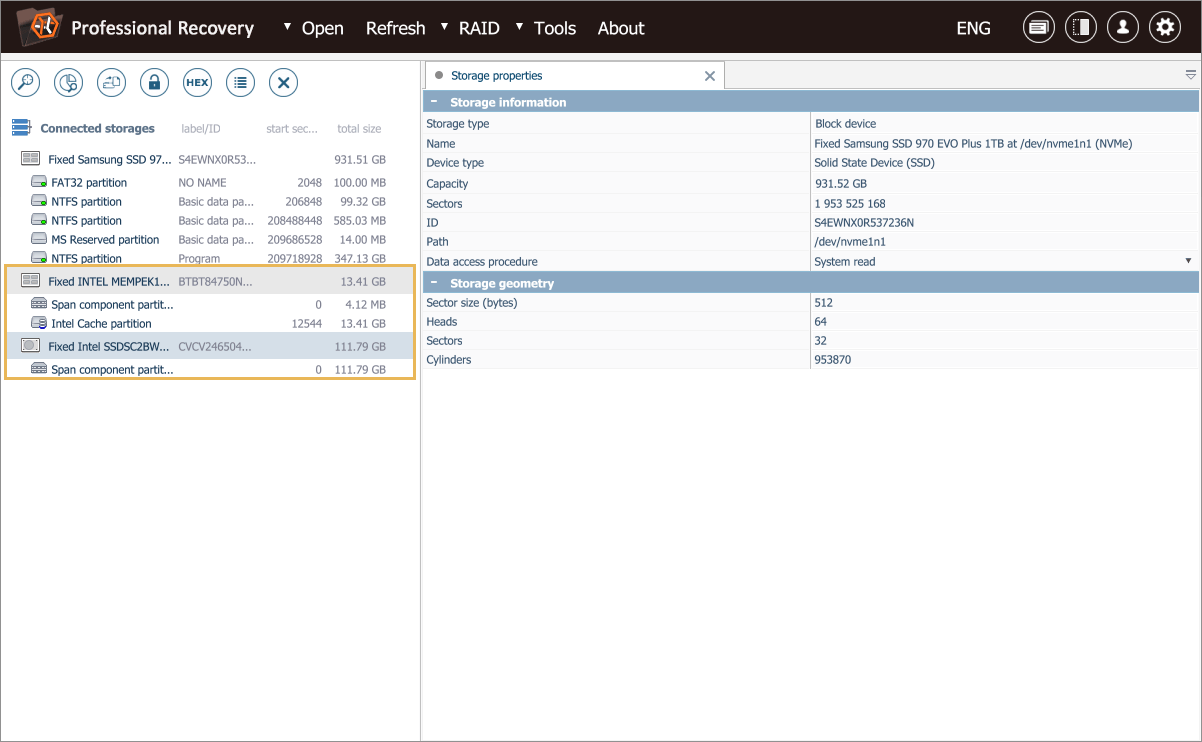
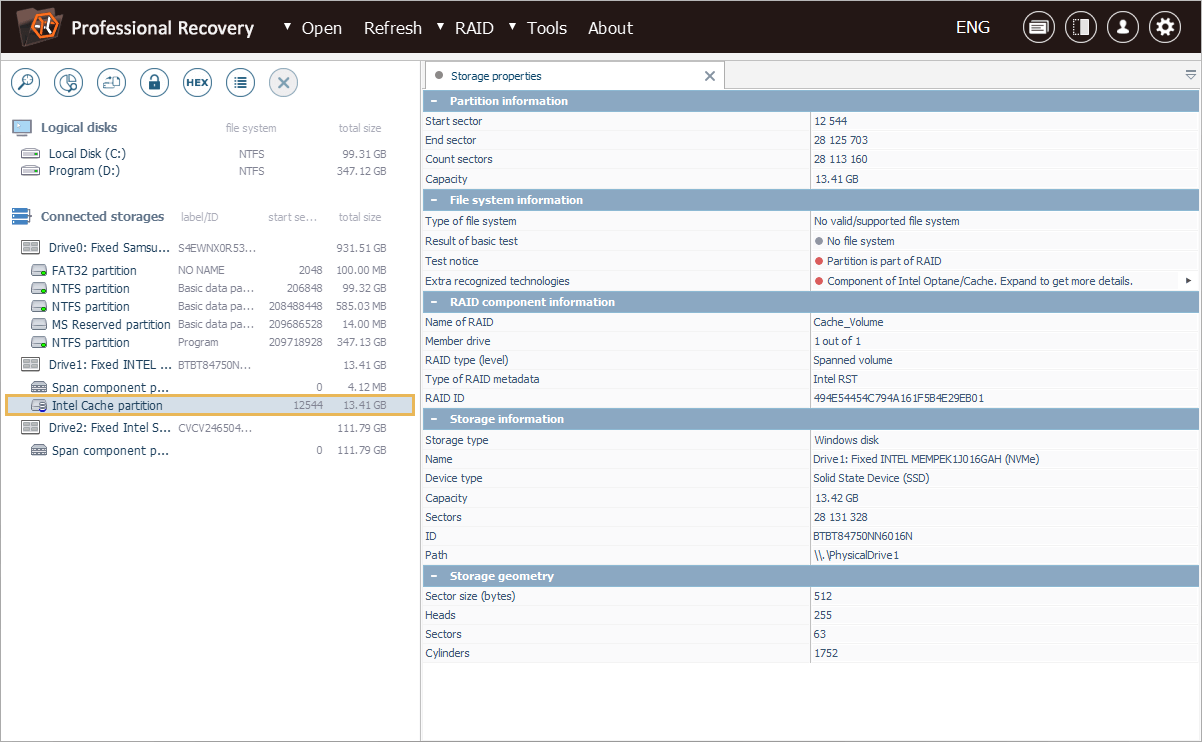
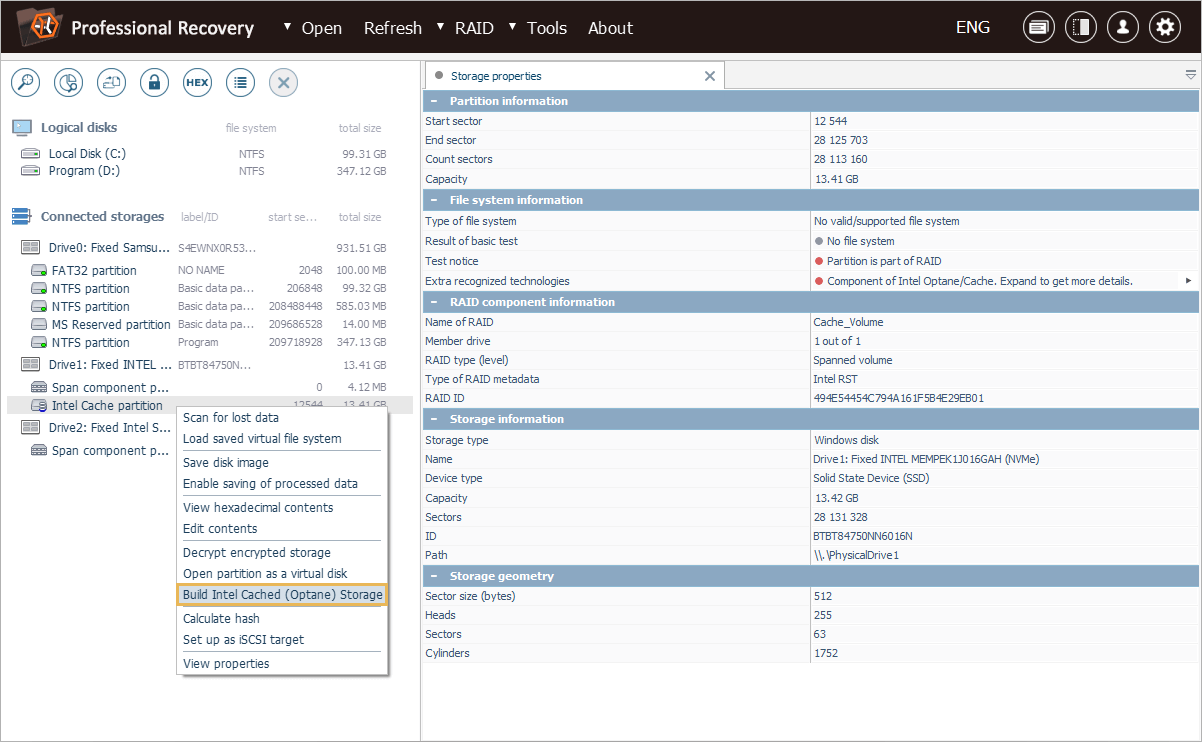
Find the "Intel cache" partition located on the Optane drive.
You may notice that both drives contain a "Span component" partition, but only one of them holds "Intel cache" marked with a distinctive icon.
-
Select the "Intel cache" partition on the Optane drive and use it to assemble your Intel Optane Memory volume.
Choose the "Build Intel Cached (Optane) storage" option from the context menu of the "Intel cache" partition.
-
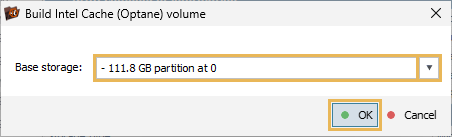
Confirm the primary storage component of your Intel Optane Memory volume selected by the program.
If there is no severe metadata damage, the software should automatically pick the corresponding volume on the primary HDD or NAND SSD. Otherwise, choose the correct one from the drop-down menu and click "OK".
-
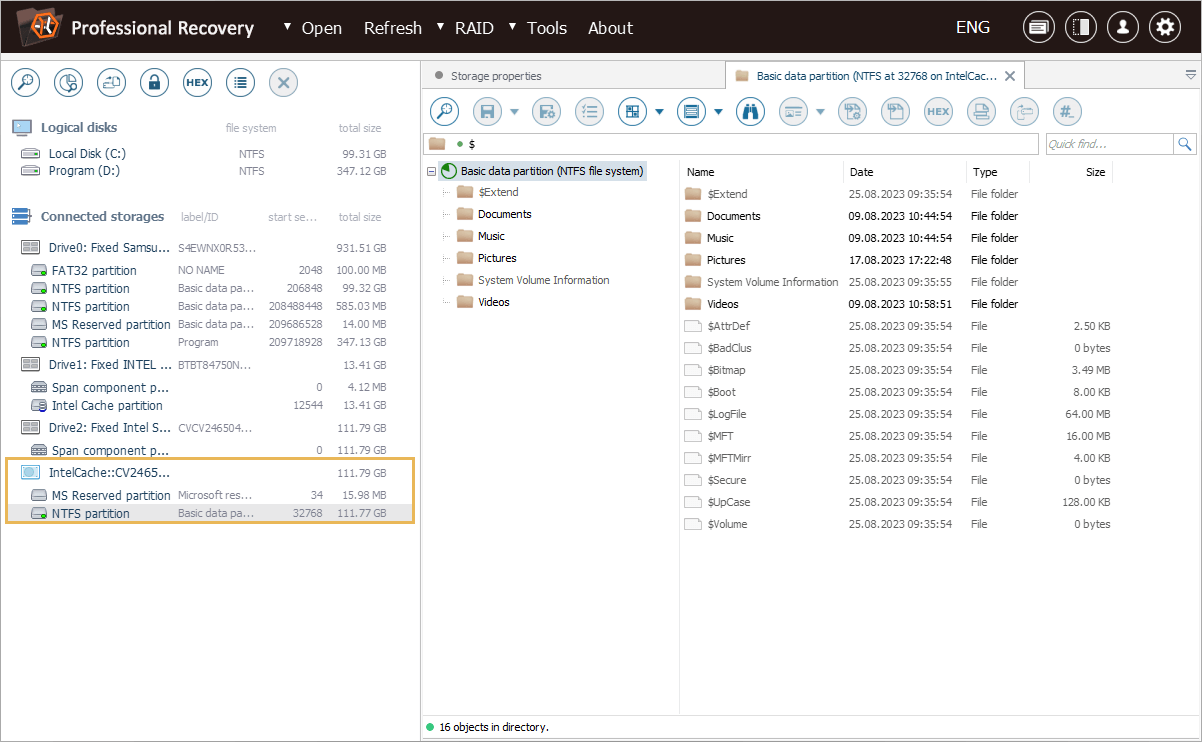
Check the content of the reconstructed Intel Optane Memory volume.
The utility will load the metadata required for correct assembly and mount the resulting virtual storage in the left pane. You may access it in order to inspect the integrity of the data.
-
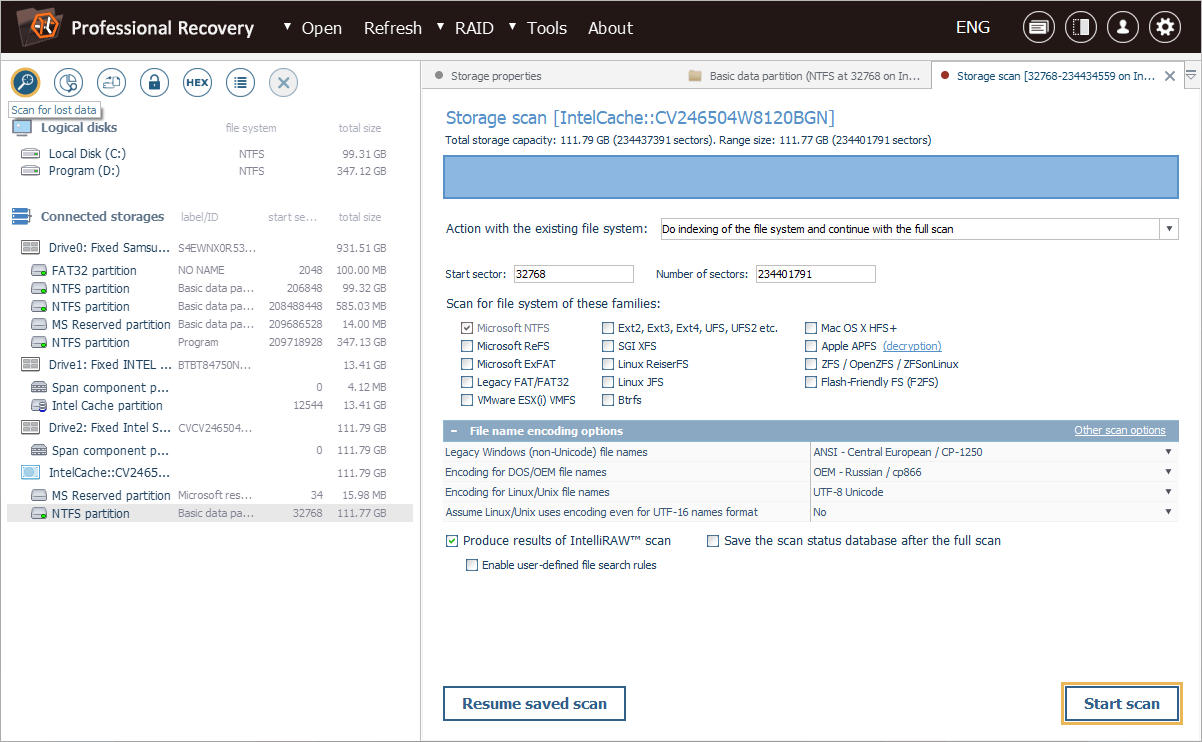
Run a scan on the resulting virtual storage to bring back the lost folders and files.
To retrieve the missing data, you will have to initiate a storage scan. For this, get the respective tool from the toolbar and press "Start scan".
Hint: More information about configuring the scan can be found in the instruction on scanning a drive with UFS Explorer.
-
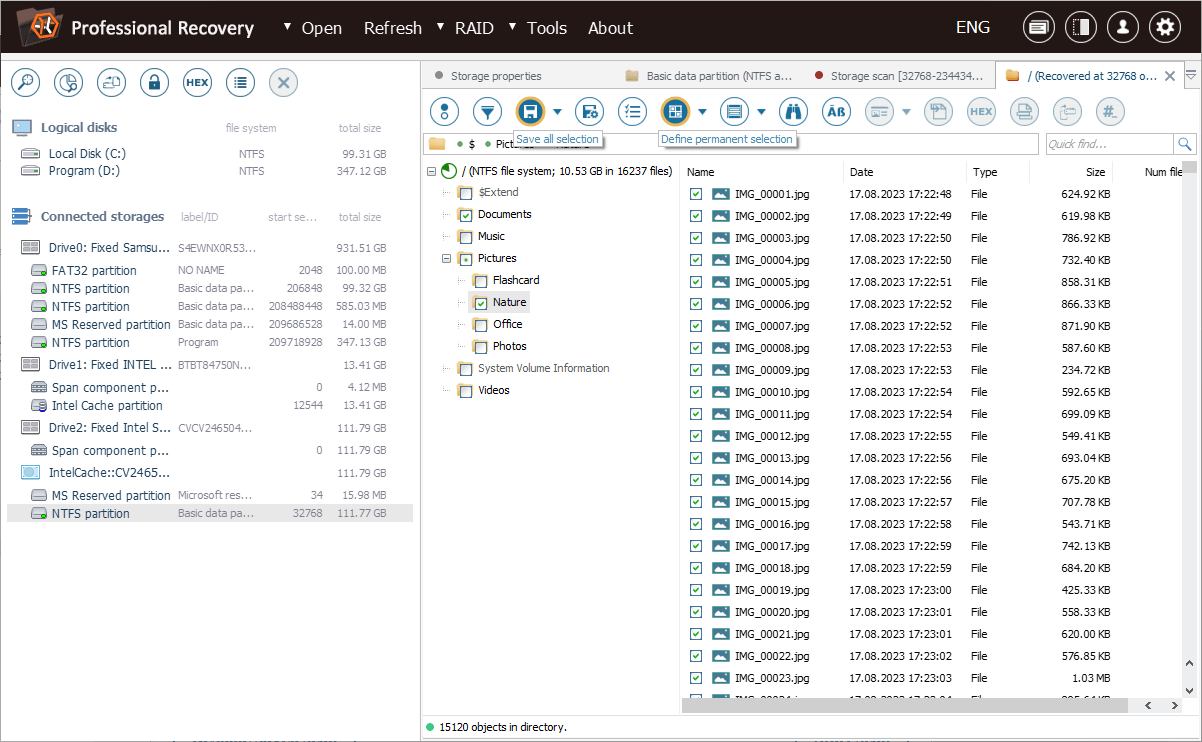
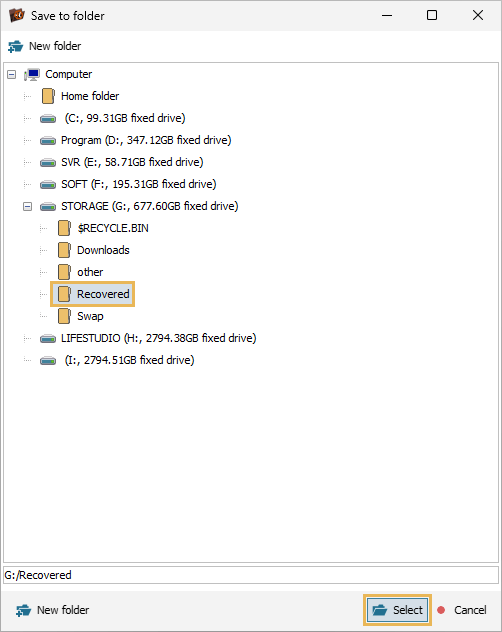
Decide which recovered items you need, select and save them to another storage.
Once the process is completed, you can browse the content of the restored file system and locate the desired folders and files. After that, enable the "Define selection" tool, mark them off and click "Save selection". In the opened dialog, define a destination folder that is not found on any of the source storage parts.
Hint: The information provided in Evaluation and saving the results of data recovery may facilitate your work with the obtained folders and files.
Last update: November 06, 2023