How to recover data from Dell EqualLogic
SAN storage solutions of Dell's EqualLogic family are recognized for their easy deployment, straightforward management and rock-solid reliability achieved through multiple safety features. Yet, even with their excellent fault-tolerance capabilities, there are still challenges such arrays may be unable to cope with: administration mistakes, power outages, connection problems, data corruption, parity issues or failures during RAID rebuild operations lead to the loss of critical corporate files and the urgent need for their recovery. Fortunately, UFS Explorer Technician and UFS Explorer Professional Recovery incorporate special techniques that make it possible to deal with various RAID configurations implemented on Dell's EqualLogic Storage Arrays and restore the missing data from EqualLogic volumes.
Still, like any complex SAN, Dell EqualLogic boxes have their peculiarities in virtual translation of address space of volumes as well as data distribution across the disks in RAID and these aspects must be taken into account during RAID reconstruction and further retrieval of lost information. The following guide describes the specifics of the data recovery procedure for Dell's EqualLogic.
Option 1: Automated process using UFS Explorer Technician
- Connect the available disks or images to the host computer.
Attach all the intact drives to the host PC. Usually, for data protection, it is recommended to use disk images instead of the original disks. The maximum number of failed components the array can compensate for is determined by the employed RAID layout.
- Install UFS Explorer Technician and Plugin for Dell Equallogic.
Run the program. It should assemble all RAID arrays from Dell Equallogic automatically. If this did not happen - you can assemble the arrays manually, using only those components that were used at the time of system shutdown. The program will show the correct RAID configurations in the "Storage properties" panel.
Hint: If one of the disks has failed before, it is not recommended to use it for assembly. If there are not enough disks for a complete configuration, use the one that failed later.
- Run the Dell EqualLogic plugin.
When all the required arrays are assembled, launch the Dell Equallogic plugin via the main menu, "Plugins" section. On its first form, make sure that the SAN is recognized and that the RAID components are assigned correctly. If not, the SAN configuration can be imported and the RAID components assigned manually. Select the SAN from the list and click "Next".
- Load a valid SAN metadata.
The program will show automatically the detected SAN metadata blocks and whether they were successfully parsed. Parse errors often mean problems with the RAID assembly. In this case, you should go back and check the configuration. If the cause of the error is metadata damage, the metadata can be assembled manually and imported into the plugin. Select the metadata to work with and click "Next".
- Select the volumes you would like to import.
The program will show the list of found volumes. You can view them by simply double-clicking on their names. After the required volumes are selected, they can be selected with checkboxes and then click "Open". The plugin will add the selected volumes to UFS Explorer, after which you can work with them as you would with any regular disks.
Hint: The program also supports volume snapshots. You can also select a snapshot of a volume from a specific date instead of its current version.
Option 2: Using UFS Explorer Professional Recovery
- Connect the available RAID disks to the host computer.
Attach all the intact drives to the host PC watching their correct order. The maximum number of failed components the array can compensate for is determined by the employed RAID layout.
Hint: Please rely on the relevant instructions to plug SAS disks to a PC or server for data recovery.
- Install UFS Explorer Professional Recovery onto the computer and launch the software.
Open the program with elevated privileges and modify its settings, if needed. All the attached disks will be presented in the left pane of the main window.
Hint: If you have any difficulties with the installation of the utility, please refer to the installation manual for UFS Explorer Professional Recovery.
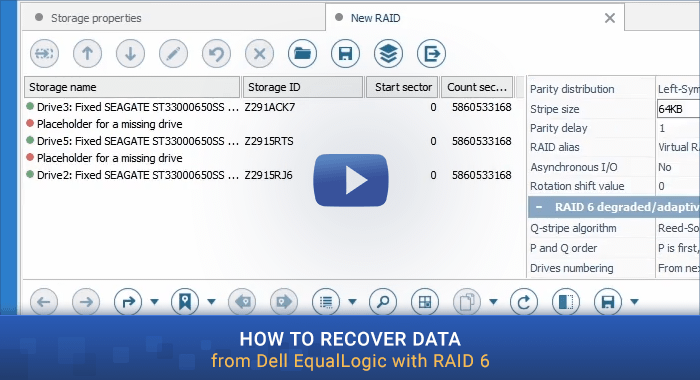
- Open RAID Builder and assemble RAID 6 from its constituent drives.
-
Create new RAID and add each of the drives to RAID in their right order. If some of the constituents are missing, add placeholders to indicate them using the corresponding tool from the toolbar.
-
In the configuration sheet, choose "RAID 6" as the RAID level and "Compact Left-Symmetric" as a parity distribution algorithm. After that, change the Q-stripe algorithm in the field below to "Diagonal XOR with Dell EqualLogic distribution".
-
Specify the correct starting position for all RAID components: for this select any of them and get the "Edit component range" instrument from the toolbar. In the opened window type in the correct start sector and apply these parameters to all components by placing a checkmark next to the respective option.
-
Finally, press "Build this RAID" to mount the storage in the list of devices.
-
- Define a logical volume on the reconstructed array.
Open the partition manager for the assembled Virtual RAID and provide the correct start of the data area in the "Start (sector)" field. Press the "Define" button and confirm the specified parameters.
- Open the volume defined in Step 4 as a separate virtual storage.
Open the partition as a virtual disk using the corresponding option in its context menu. This operation will mount it in the list of storages in the left pane.
- Mount the data map of your EqualLogic volume in the list of connected storages.
A volume data map is essential for correct reading of data within an EqualLogic volume. UFS Explorer works with map files in the .dsk format which are created through the conversion of volume metadata.
Note: A volume data map file can be provided by any data recovery company which is qualified to parse Dell EqualLogic metadata. SysDev Laboratories renders this kind of service on a remote basis. Please, feel free to contact us for details.
Choose the "Disk image file or virtual disk" option from the "Open" item of the main menu, navigate to the location where the .dsk file is stored and click "Open".
- Build Span comprised of the defined virtual volume and the volume data map.
Add the virtual volume opened in Step 5 and the data map from Step 6 to a new disk array. In the configuration sheet set the "RAID level" as "Span of storages" and build the storage.
- Open the "Unknown" partition mounted on the assembled Span as a virtual disk.
For this choose the "Open partition as a virtual disk" option from the context menu. The opened storage will be a valid virtual representation of your EqualLogic volume.
- Scan the partition on the opened virtual storage to recover deleted or lost files.
Select this partition and pick the "Scan for lost data" option from its context menu. If necessary, modify the parameters of the procedure, and then press "Start scan".
- Select the recovered items you need and copy them to any safe storage.
Wait for the program to finish the scanning process. After that, explore the reconstructed file system to locate the necessary folders and files. Press "Define selection", tick off the items you are going to save and click and press "Save selection". In the opened window provide any safe destination folder for the recovered data.
To gain a better understanding of the Dell EqualLogic recovery process, please, watch the following video:
Last update: May 08, 2024