Creating an on-demand imaging task for saving individual files or folders
The majority of disk imaging solutions allow creating a complete sector-by sector copy of a hard disk drive or other storage medium in another location. Yet, this traditional approach is inherently time-consuming and may be impractical when dealing with certain disk issues, like defective areas, slow reading speeds or excessive heat. Such problems can significantly prolong the cloning process. They also tend to worsen due to the stress caused by continued drive’s activity, increasing the likelihood of its mechanical failure. In the described scenarios, as well as under the lack of time, space or other resources, the procedure can be optimized by picking small portions of critical data while leaving out the rest that is not essential.
The on-demand imaging functionality of UFS Explorer Professional Recovery makes it possible to select a set of files/folders that will be included to the disk image, without going through lengthy copying of the whole drive. This approach accelerates the operation, ensuring that the required data is captured without the unnecessary overhead. The information will be transferred right upon access to the corresponding sectors (including metadata, files, etc.), whereas its further reading will occur from the destination drive only, preventing repeated references to the same locations on the source. Plus, the software can save only the blocks that are marked as used by the given items according to the file system metadata, which will also result in a much smaller image size.
Please follow these instructions to choose only a few folders or files from the vast amount of the drive’s data and perform their real-time imaging:
-
Install and run UFS Explorer Professional Recovery.
Open the program with administrator rights and, if required, modify its settings.
Warning: If your drive is experiencing any hardware issues, certain measures must be implemented to keep it operational for as long as possible. Please familiarize yourself with the article devoted to the specifics of work with defective drives BEFORE you run the software.
-
Select the drivethat contains the necessary data in the left pane of the main window.
Find the drive in the list of attached storages or follow the specific opening procedure recommended for handling defective drives.
To review the intact content, you may double-click a recognized partition displayed under the drive or use the "Explore file system" context menu option.
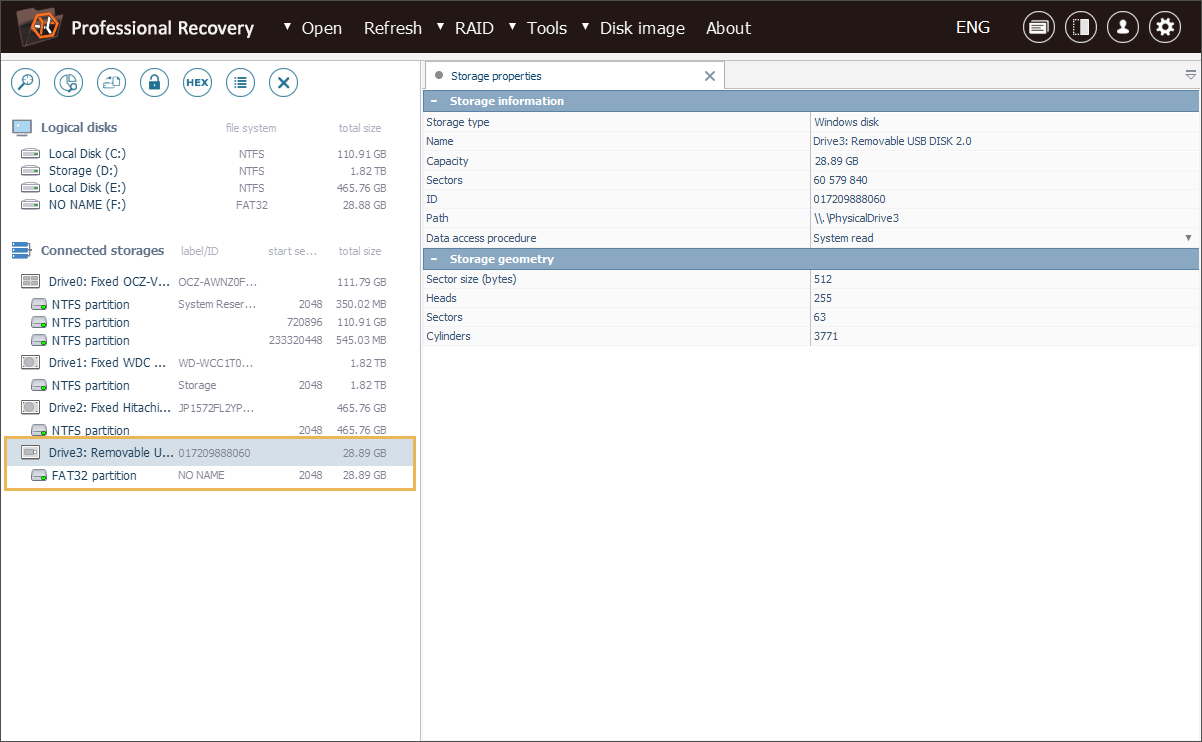
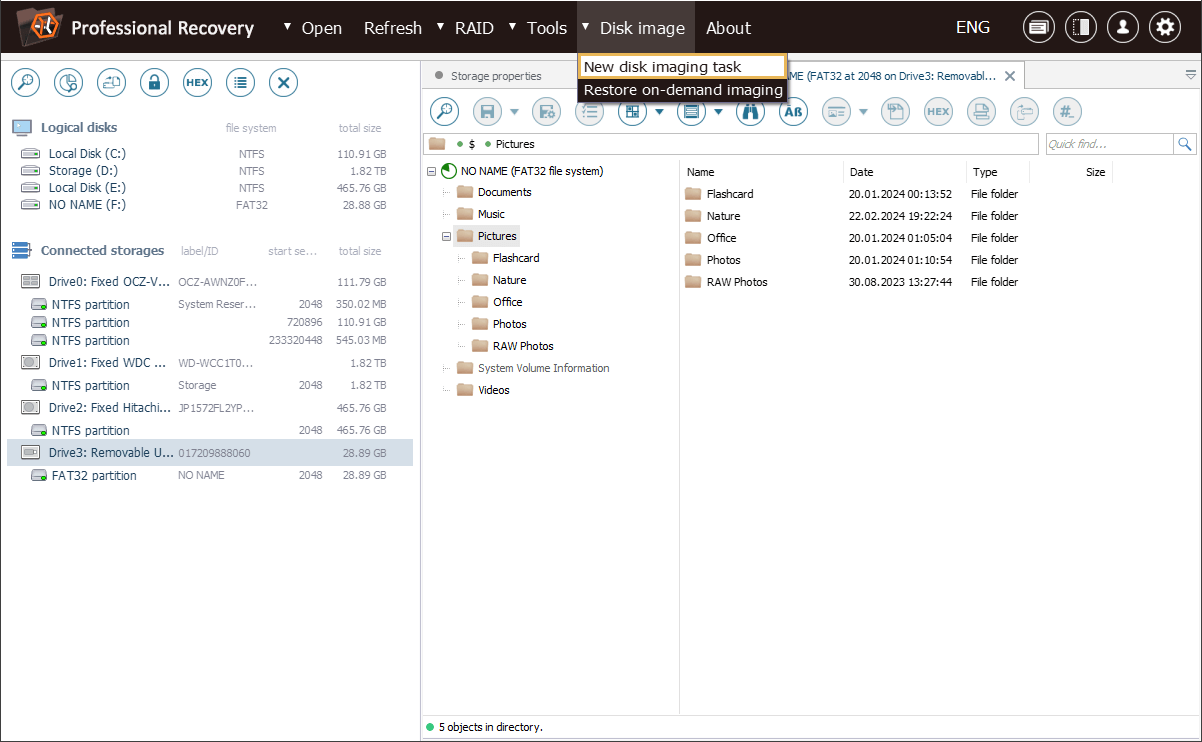
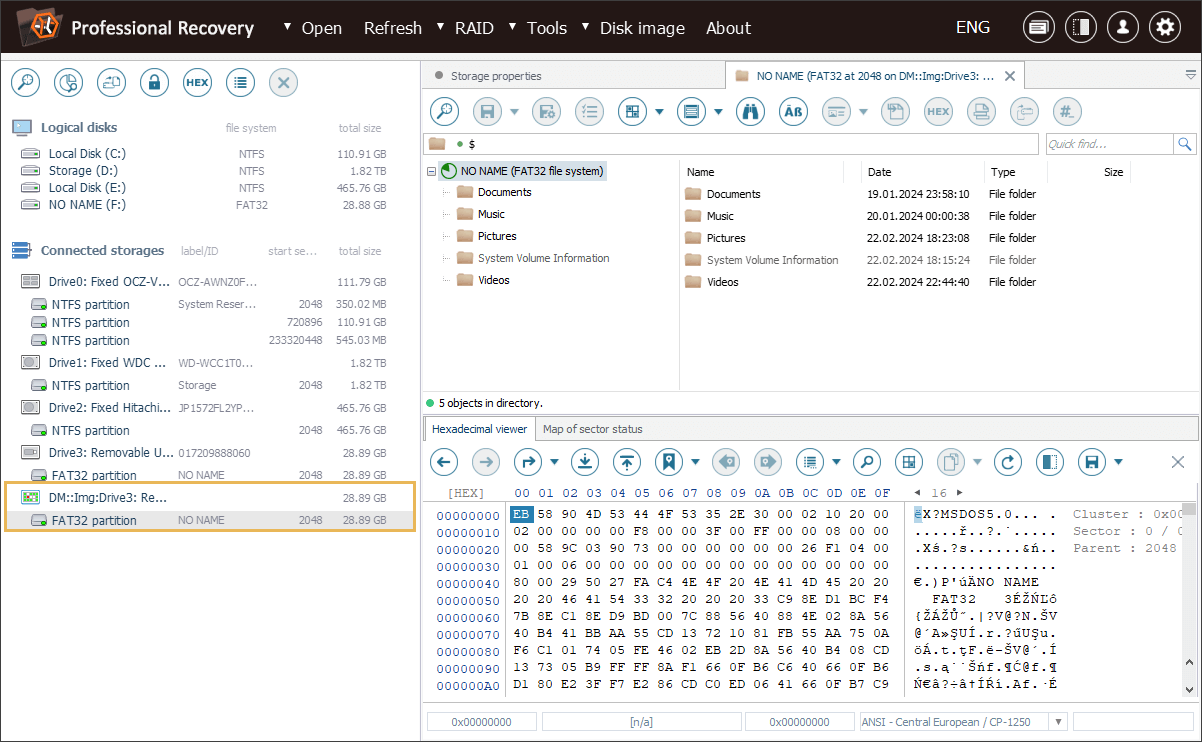
As an example, we have a USB stick of 29 GB with the FAT32 file system.
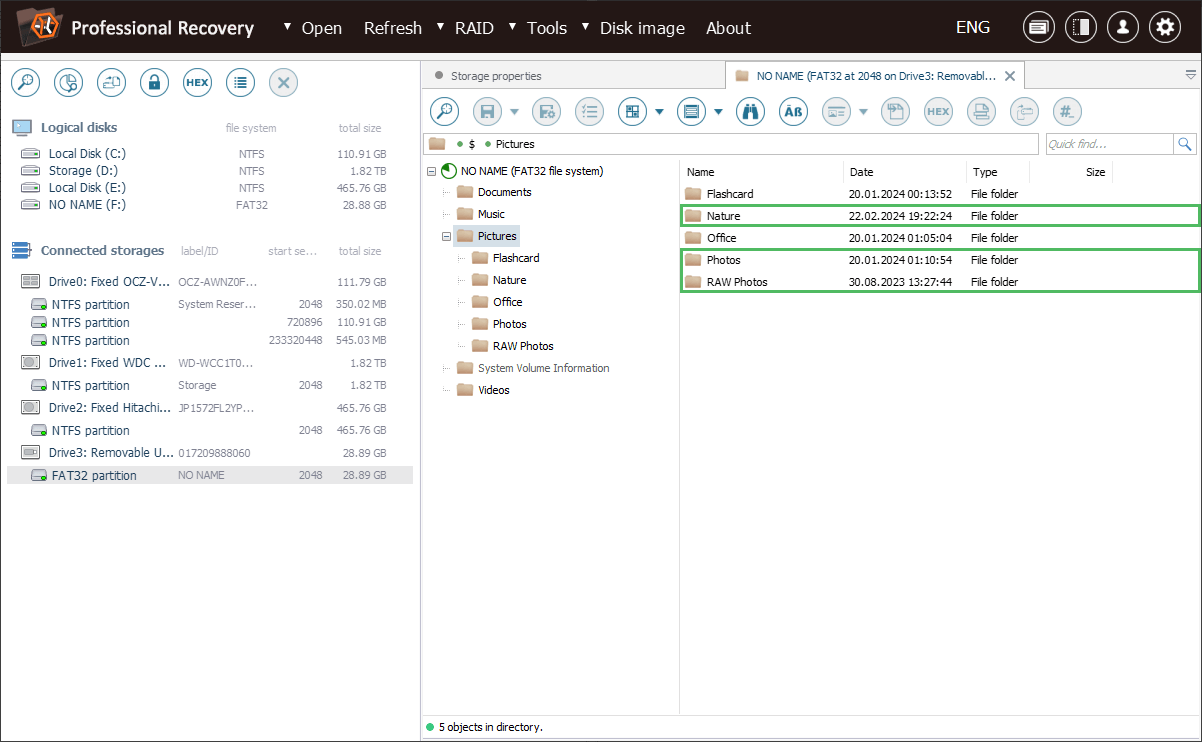
From our thumb drive we need some specific folders that are indicated on the screenshot below.
-
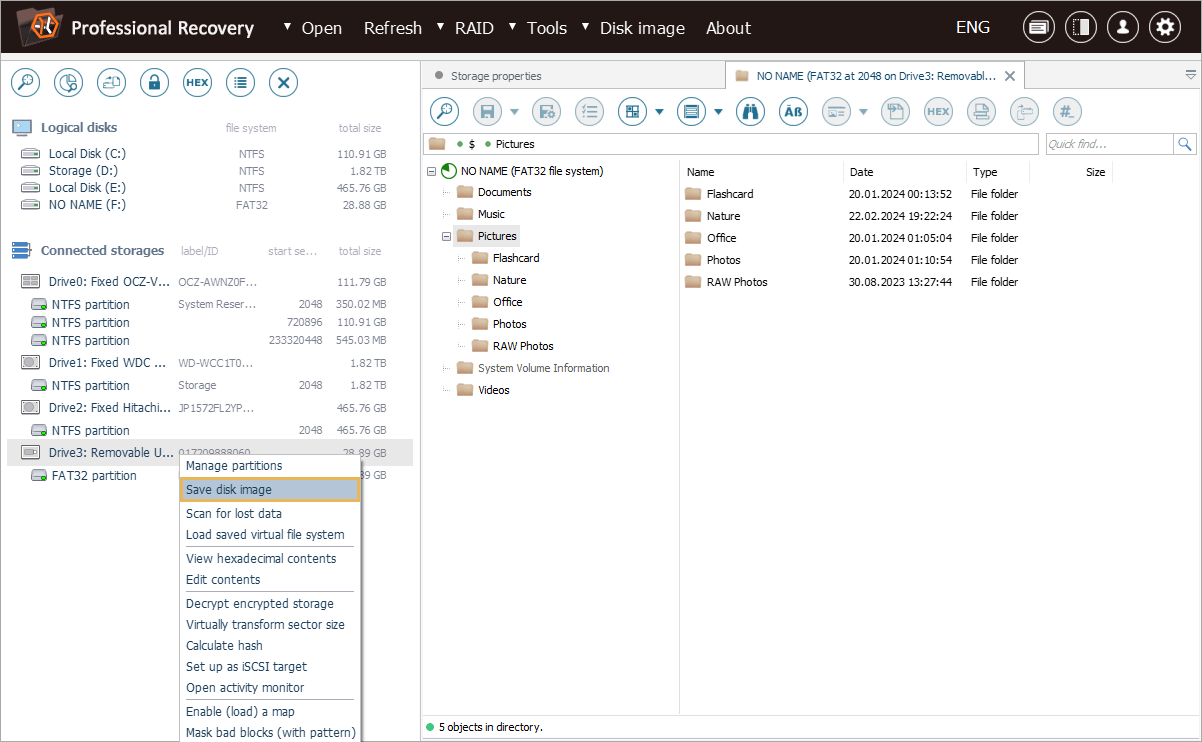
Create a new on-demand disk imaging task for the given drive.
Open the drive’s context menu and select the "Save disk image" option from it.
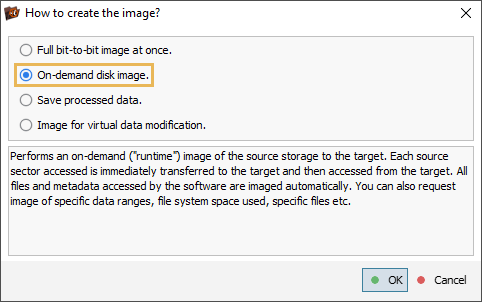
In the opened dialog, set the "On-demand disk image" mode with the help of the radio button.
As an alternative, you may also navigate to the "Disk image" item in the program’s main menu and get the "New disk imaging task" option. Yet, in this case, you will need to choose the target storage from the provided drop-down list, in addition to the imaging mode.
-
Configure the created disk imaging task according to your specific requirements.
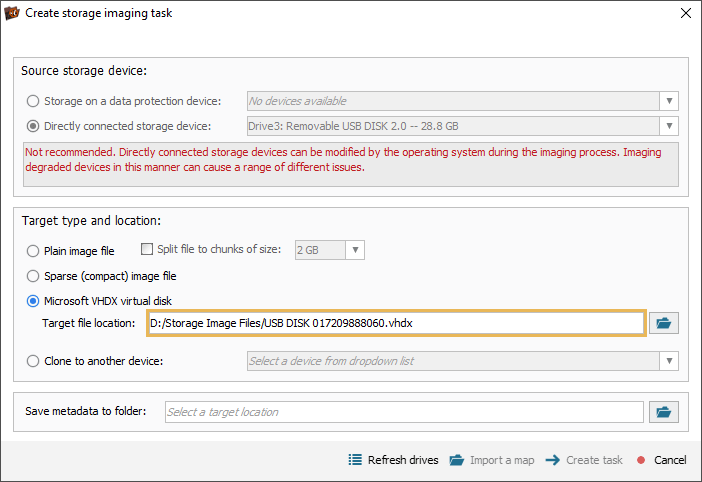
In the "Create storage imaging task" window, specify the available disk imaging parameters:
-
Source storage device
In this section, it is possible to choose between a storage medium directly connected to the computer or working through a data protection device (provided that the software has detected a supported adaptor/bridge type). It's important to note that direct connection may be suitable for imaging intact drives, while using a data protection device is recommended for tasks involving defective media. Such an appliance serves as an intermediary between the computer and the drive, shielding it from OS operations that pose serious risks to the condition of a faulty storage device.
-
Target type and location
Through this section, you can set the desired destination file type/path or opt for cloning straight to another physical storage.
The "Plain image file" option allows creating a regular *.DSK file, without metadata, with a size that corresponds to the size of the imaged storage.
The "Split file to chunks of size" option enables you to divide this plain disk image file into smaller chunks, each of a specified size.
The "Sparse (compact) image file" option provides the resulting image file in the proprietary *.SDLSP format that utilizes sparse allocation. Only sectors with actual data will be stored in the image file, which significantly reduces its size.
The "Microsoft VHDX virtual disk" option offers the possibility to create a *.VHDX virtual drive that can also be mounted under Windows.
The "Target file location" parameter specifies the directory where the resulting disk image file will be saved and the name for the file itself.
With the "Clone to another device" option enabled, the data is simply copied from the source disk to another storage medium selected from the drop-down list. However, its capacity must be no smaller than the storage to be imaged.
The information about the imaging status will be saved to a built-in block states (defects) map in case of the *.SDLSP format or an external *.SDMF format map for other target types.
In our example, we decided on the *.VHDX file format.
-
-
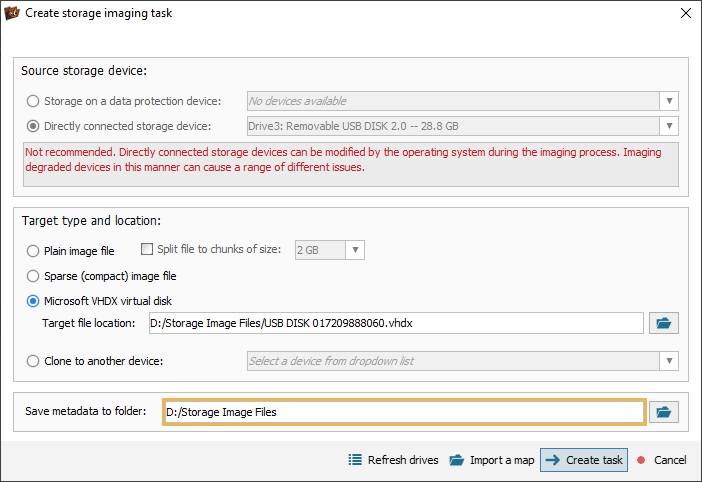
Provide a folder for the metadata files associated with the disk image.
Select a location for saving a block states map (in case of an external type) and a task configuration file in the *.UITASK format. The latter can be used to restore the imaging task anytime after the program’s restart, whether it's completed or still in progress. You can load it with the help of the "Restore on-demand imaging" option from the "Disk image" menu and resume imaging from where you left on.
We are going to save our metadata files to the same folder as the disk image.
-
Create the imaging task with the defined settings.
Press the "Create task" button, and a new "Storage imager task" item will appear in the left pane of the main screen. Further operations must be performed on this virtually mounted storage instead of the original drive.

-
Select this "Storage imager task" item to open the control panel for your task.
The task control panel will contain a visual representation of block states (defects) and activity indication, enabling you to monitor the imaging progress in real time.
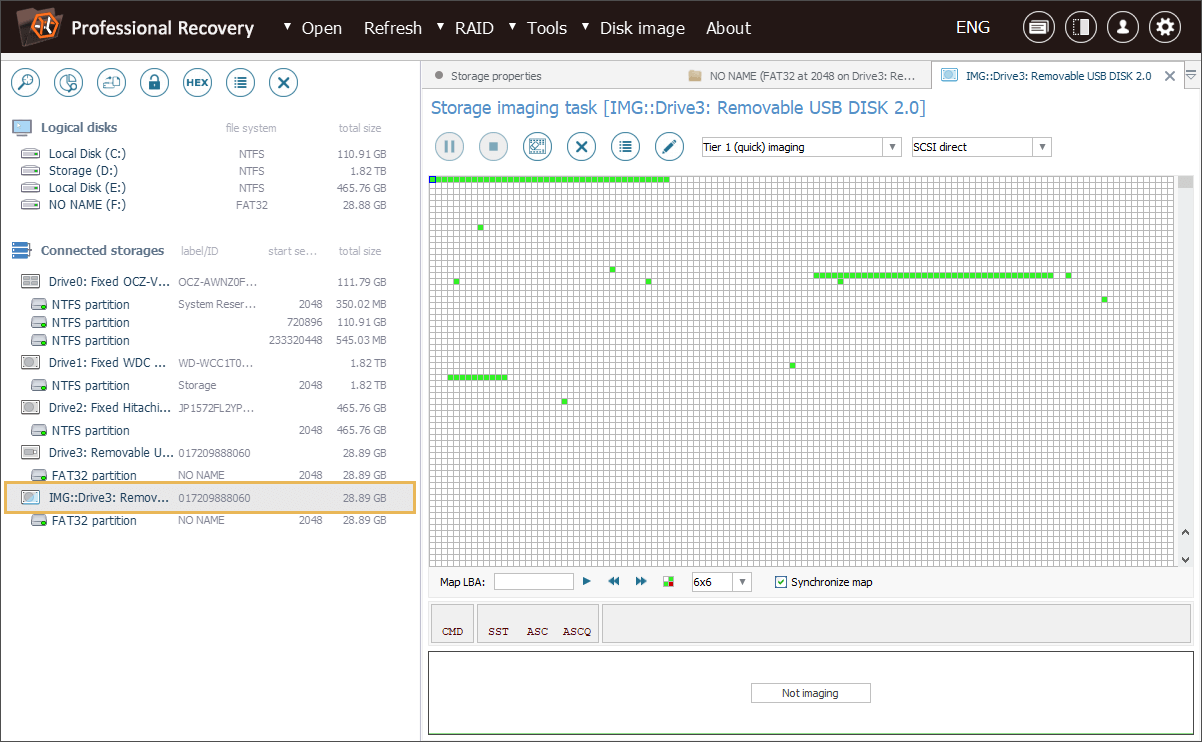
You can also refer to this panel to manage the task and fine-tune the imaging parameters using the toolbar at the top.
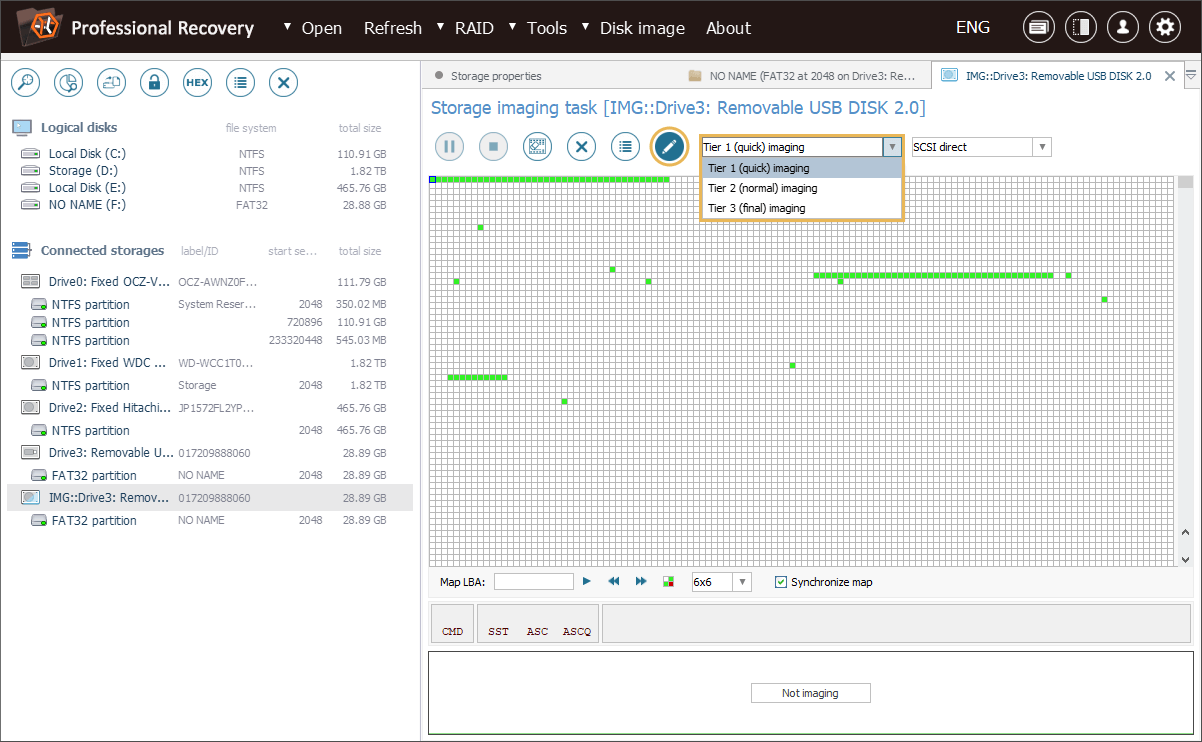
The software offers three pre-configured imaging tiers tailored to different imaging scenarios (normal/quick/final imaging). You can easily switch between the tiers and modify the settings within each tier using the "Edit imaging configuration" tool, such as multi-pass imaging, timeouts and others, as detailed in How to create a disk image.
-
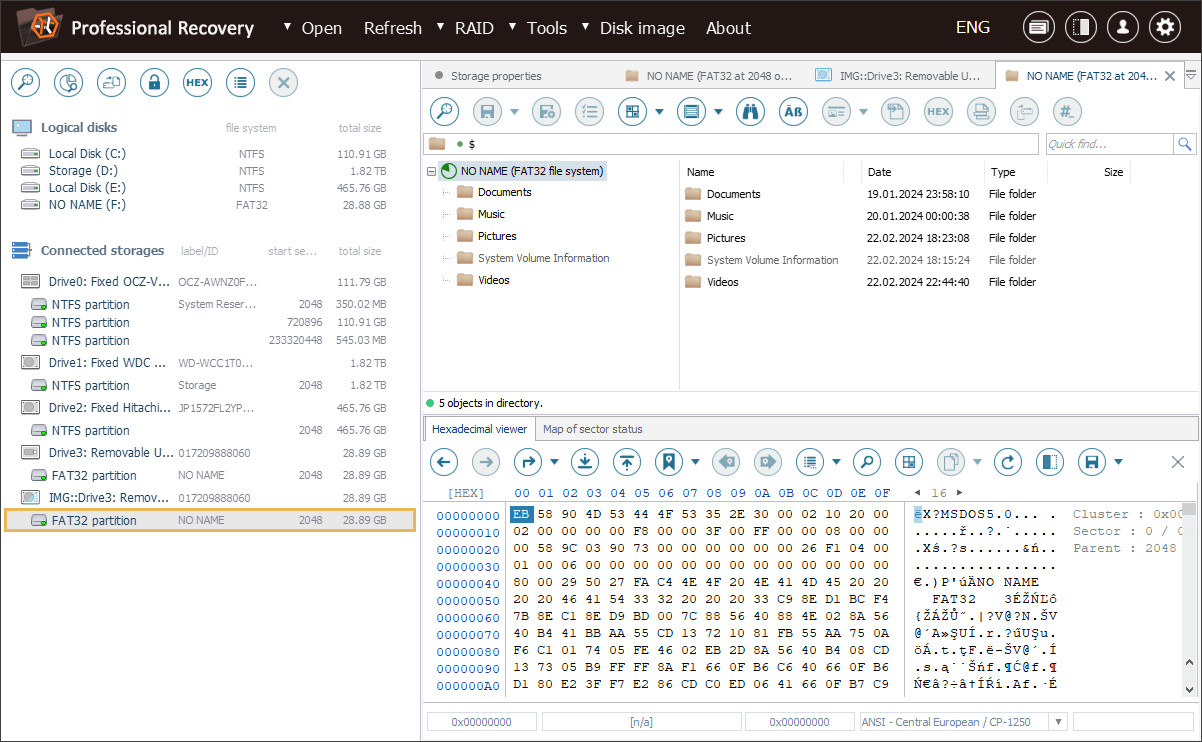
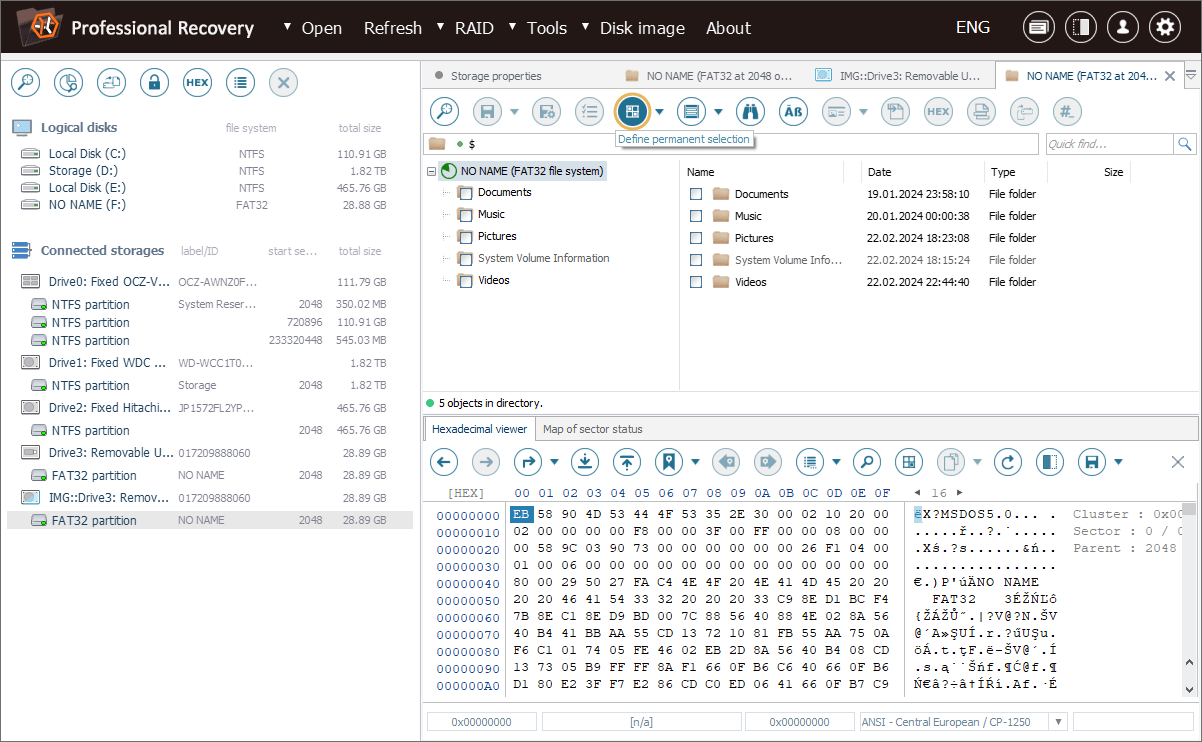
Navigate to the partition that holds the files/folders you need to image.
Pick out a partition from the ones listed under the "Storage imager task" item and open its content using a double click or the "Explore file system" option in its context menu.
-
Enable the mode of files/folders selection and pick out the required elements.
Get the "Define permanent selection" tool from the toolbar and put checkmarks next to each item you want to be saved to the image.
-
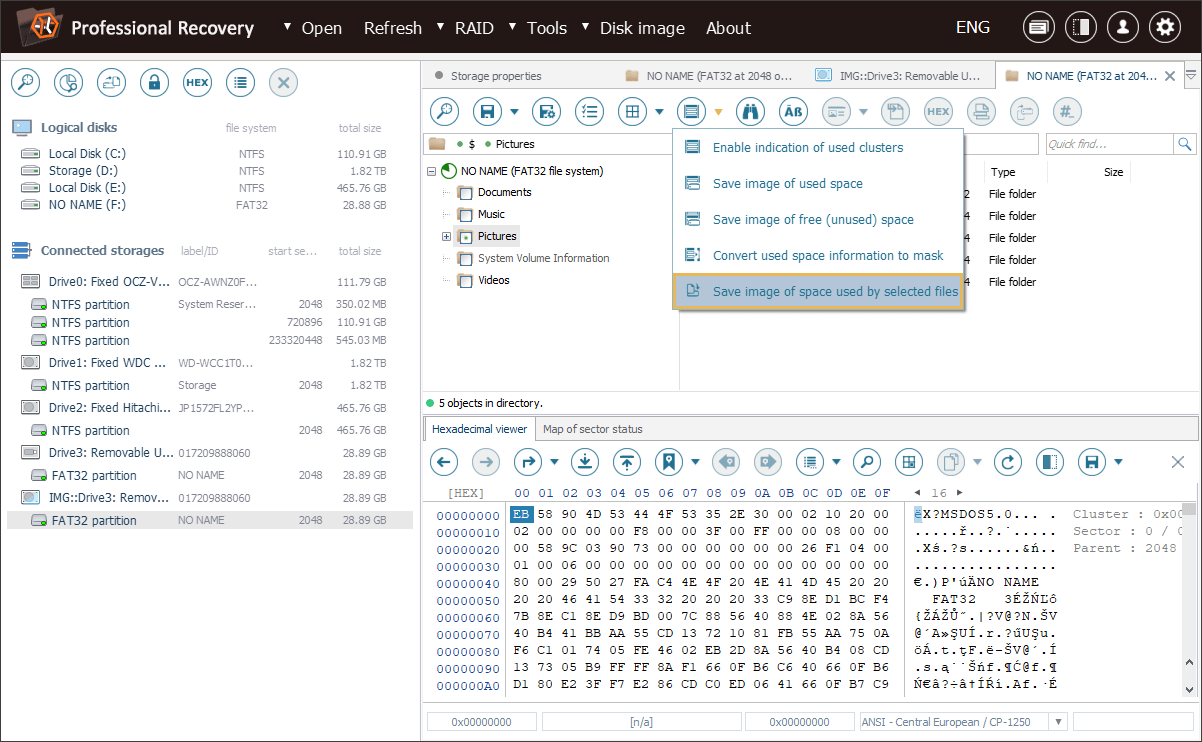
Create a disk image from the storage space used by the items you’ve selected.
Find the "Enable indication of used clusters" tool in the toolbar, launch its context menu and select the "Save image of space used by selected files" option from it.
-
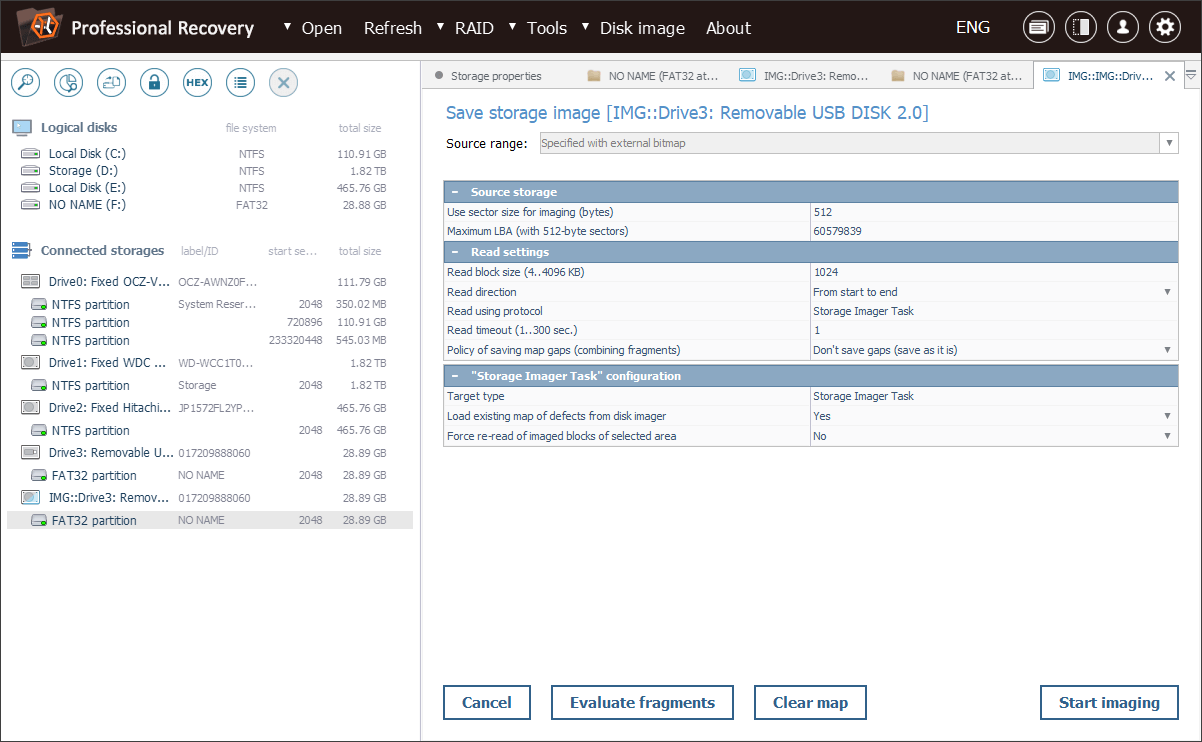
If necessary, configure the data reading parameters.
The opened tab will present settings for a simplified disk imaging procedure (without control over defects). The image will be created on the basis of the files location map generated by the program. You may alter the size of the data block that will be read "in one go", change the direction of storage reading and time to wait for the data from the drive as described in How to create a disk image. It is also possible to define the policy for combining segments in the cases of file fragmentation and cross-fragmentation, for instance, to ignore all "gaps" or save the ones that do not exceed a certain size.
-
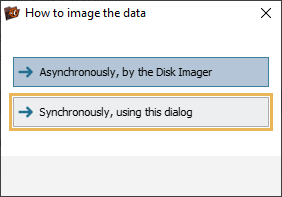
Launch the imaging procedure.
Press the "Start imaging" button to initiate the process. In the pop-up window, you can choose between synchronous imaging and be able to control the procedure via the current dialog, or asynchronous imaging performed in the background.
-
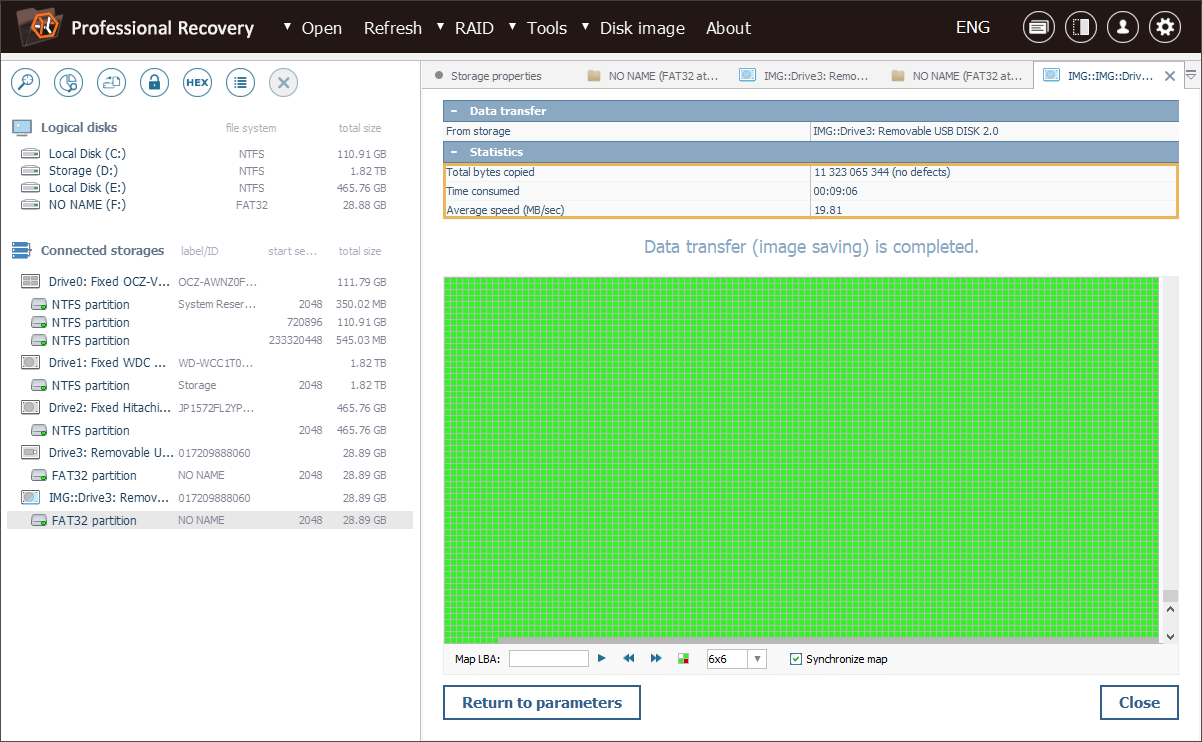
Wait for the imaging to be completed.
If opted for synchronous imaging, you may follow its progress in the dedicated pane.
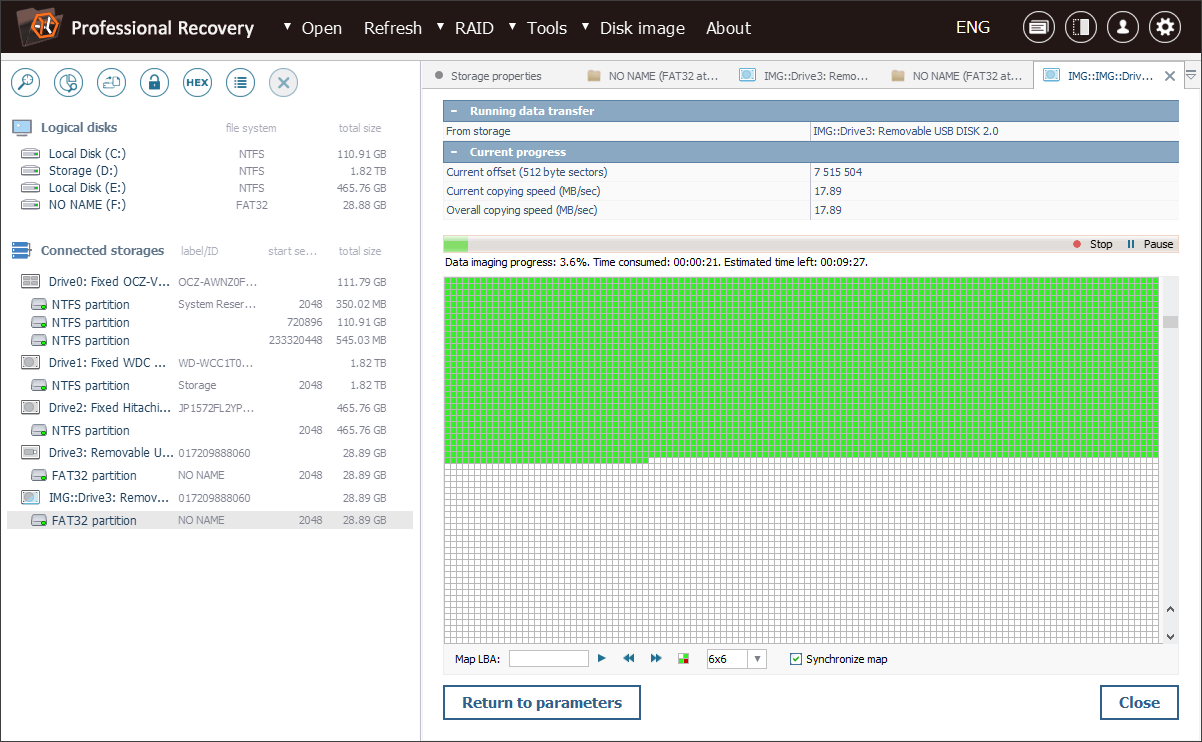
Once accomplished, the software will also show the imaging statistics: the amount of data that was copied, the time spent and the average speed. As you can see, in our case the procedure took less than ten minutes.
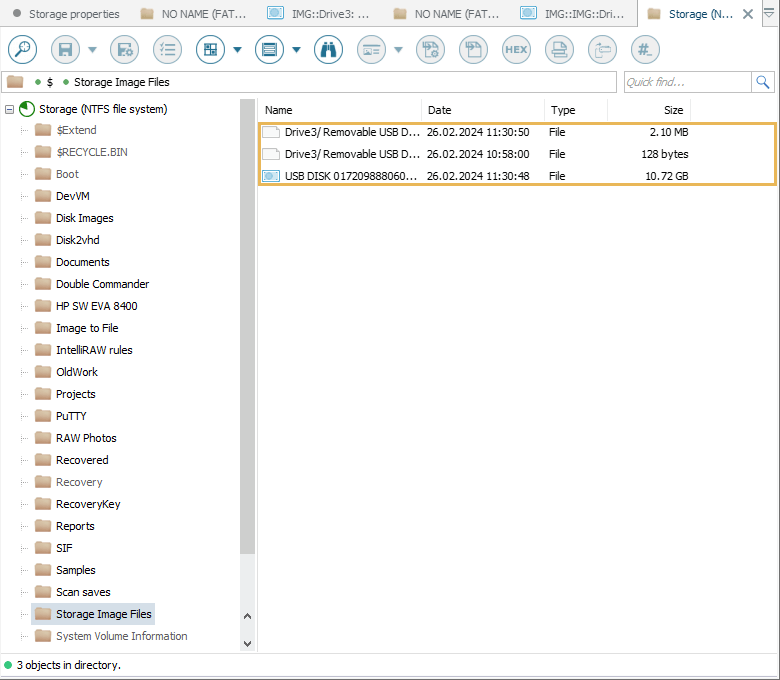
As a result, we have three files: our disk image created in the *.VHDX format, a *.UITASK file with the task configuration and an *.SDMF file that contains a map of block states (defects).
The created image may be opened in the program’s interface for further manipulations. For this, you can go to the "Open" menu and choose the "Disk image file or virtual disk" item in it.
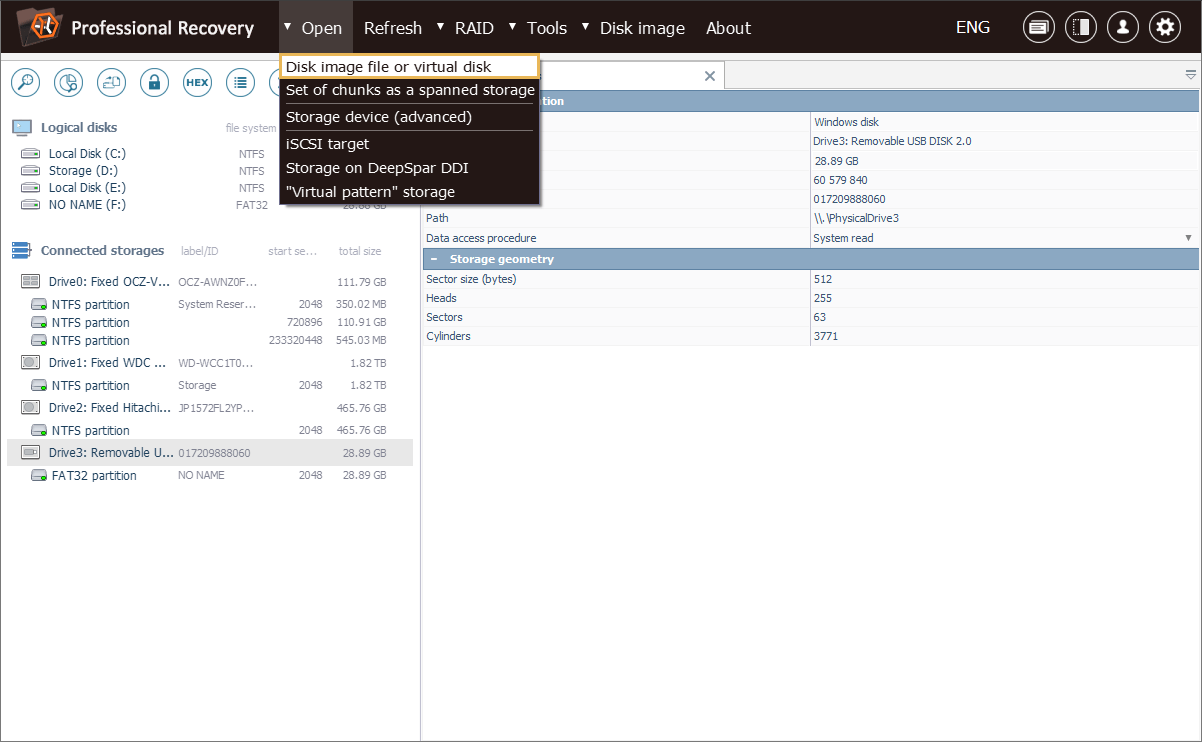
In the opened dialog, navigate to the location to which it has been saved.
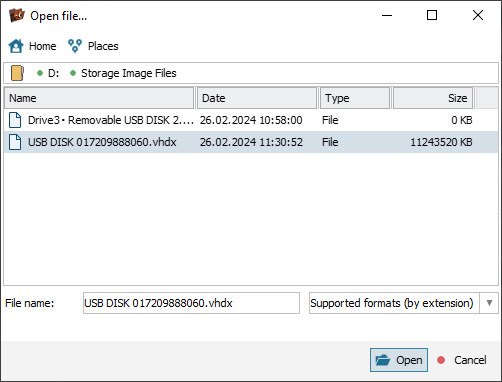
After that, you may process the opened disk image similarly to any common storage device.
Overall, by focusing on the high-priority data, we have achieved much faster imaging time while reducing the load on our drive that could lead to its potential degradation during the procedure.
Last update: March 07, 2024